---
title: How to activate VNETWORK WAF Free for your website
description: Activation guide for WAF Free for both SSL and non-SSL websites—protect your website for free in just a few simple steps.
slug: huong-dan-kich-hoat-waf-free-3-buoc
type: news
locale: en-US
author: Tony Dang
date: "2026-09-03T02:08:56.063Z"
lastmod: "2026-09-07T06:36:16.213Z"
thumbnail: "https://static.vncdn.vn/vnetwork.vn/pub/websites/uploads/1/92/huong-dan-kich-hoat-waf-free-thumb-en.png"
sabo: "A website without a layer of defense can be scanned and attacked at any time, while most SMEs do not yet have a technical team to deploy security on their own. WAF Free was created to solve exactly this problem: quick activation, no cost, and no need to change the existing system architecture. "
---
1. Overview of VNETWORK WAF Free
WAF Free is the free tier of VNETWORK's web and app security service, giving your website an application layer defense right away at no cost. WAF (Web Application Firewall) detects and blocks malicious requests before they reach the origin server, most notably vulnerabilities listed in the OWASP Top 10, such as SQL Injection or XSS.
Small and medium businesses are often prime targets for attacks because they lack dedicated security staff and budget. WAF Free helps close this gap, while also supporting businesses in meeting legal obligations related to protecting information systems and user data.
WAF Free comes with the following features:
Blocks attacks that exploit vulnerabilities listed in the OWASP Top 10.
Protects against DDoS attacks, keeping the website stable without business interruption.
Ticketing support through the support ticket system
With basic security needs covered, WAF Free gives a website a proper defense layer right from the start.
2. Where to activate WAF Free in the Partner Portal?
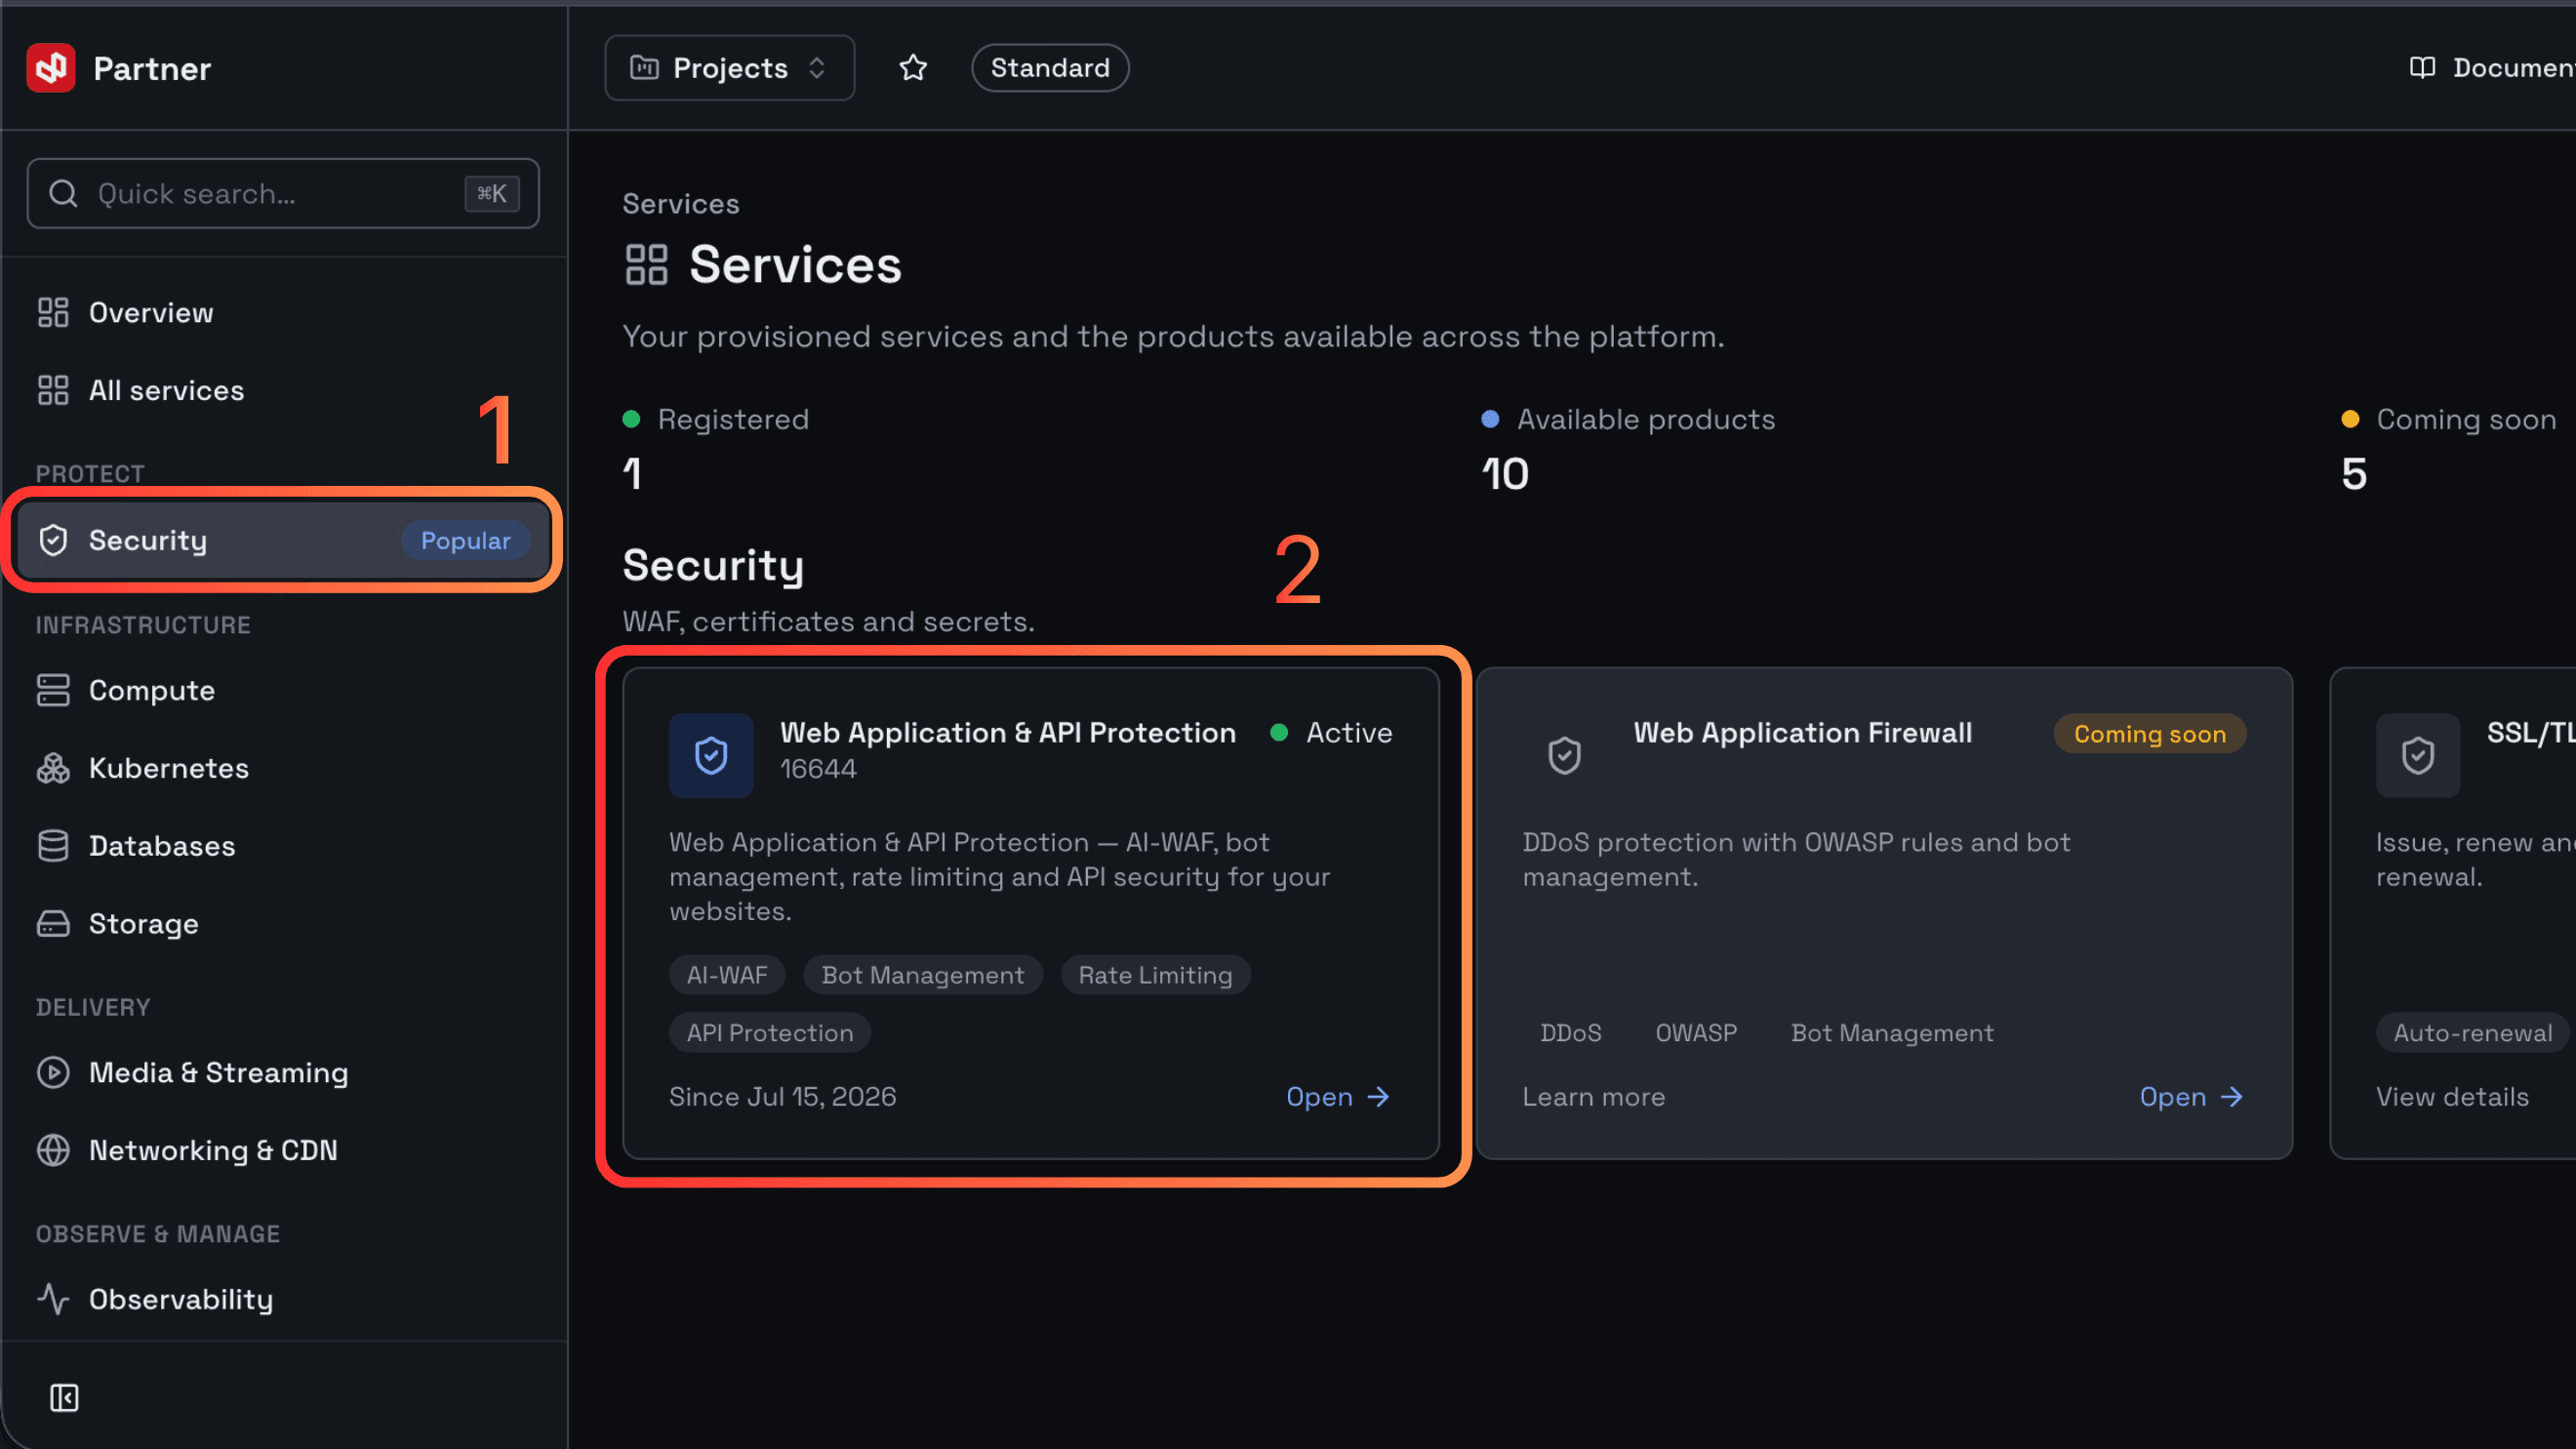
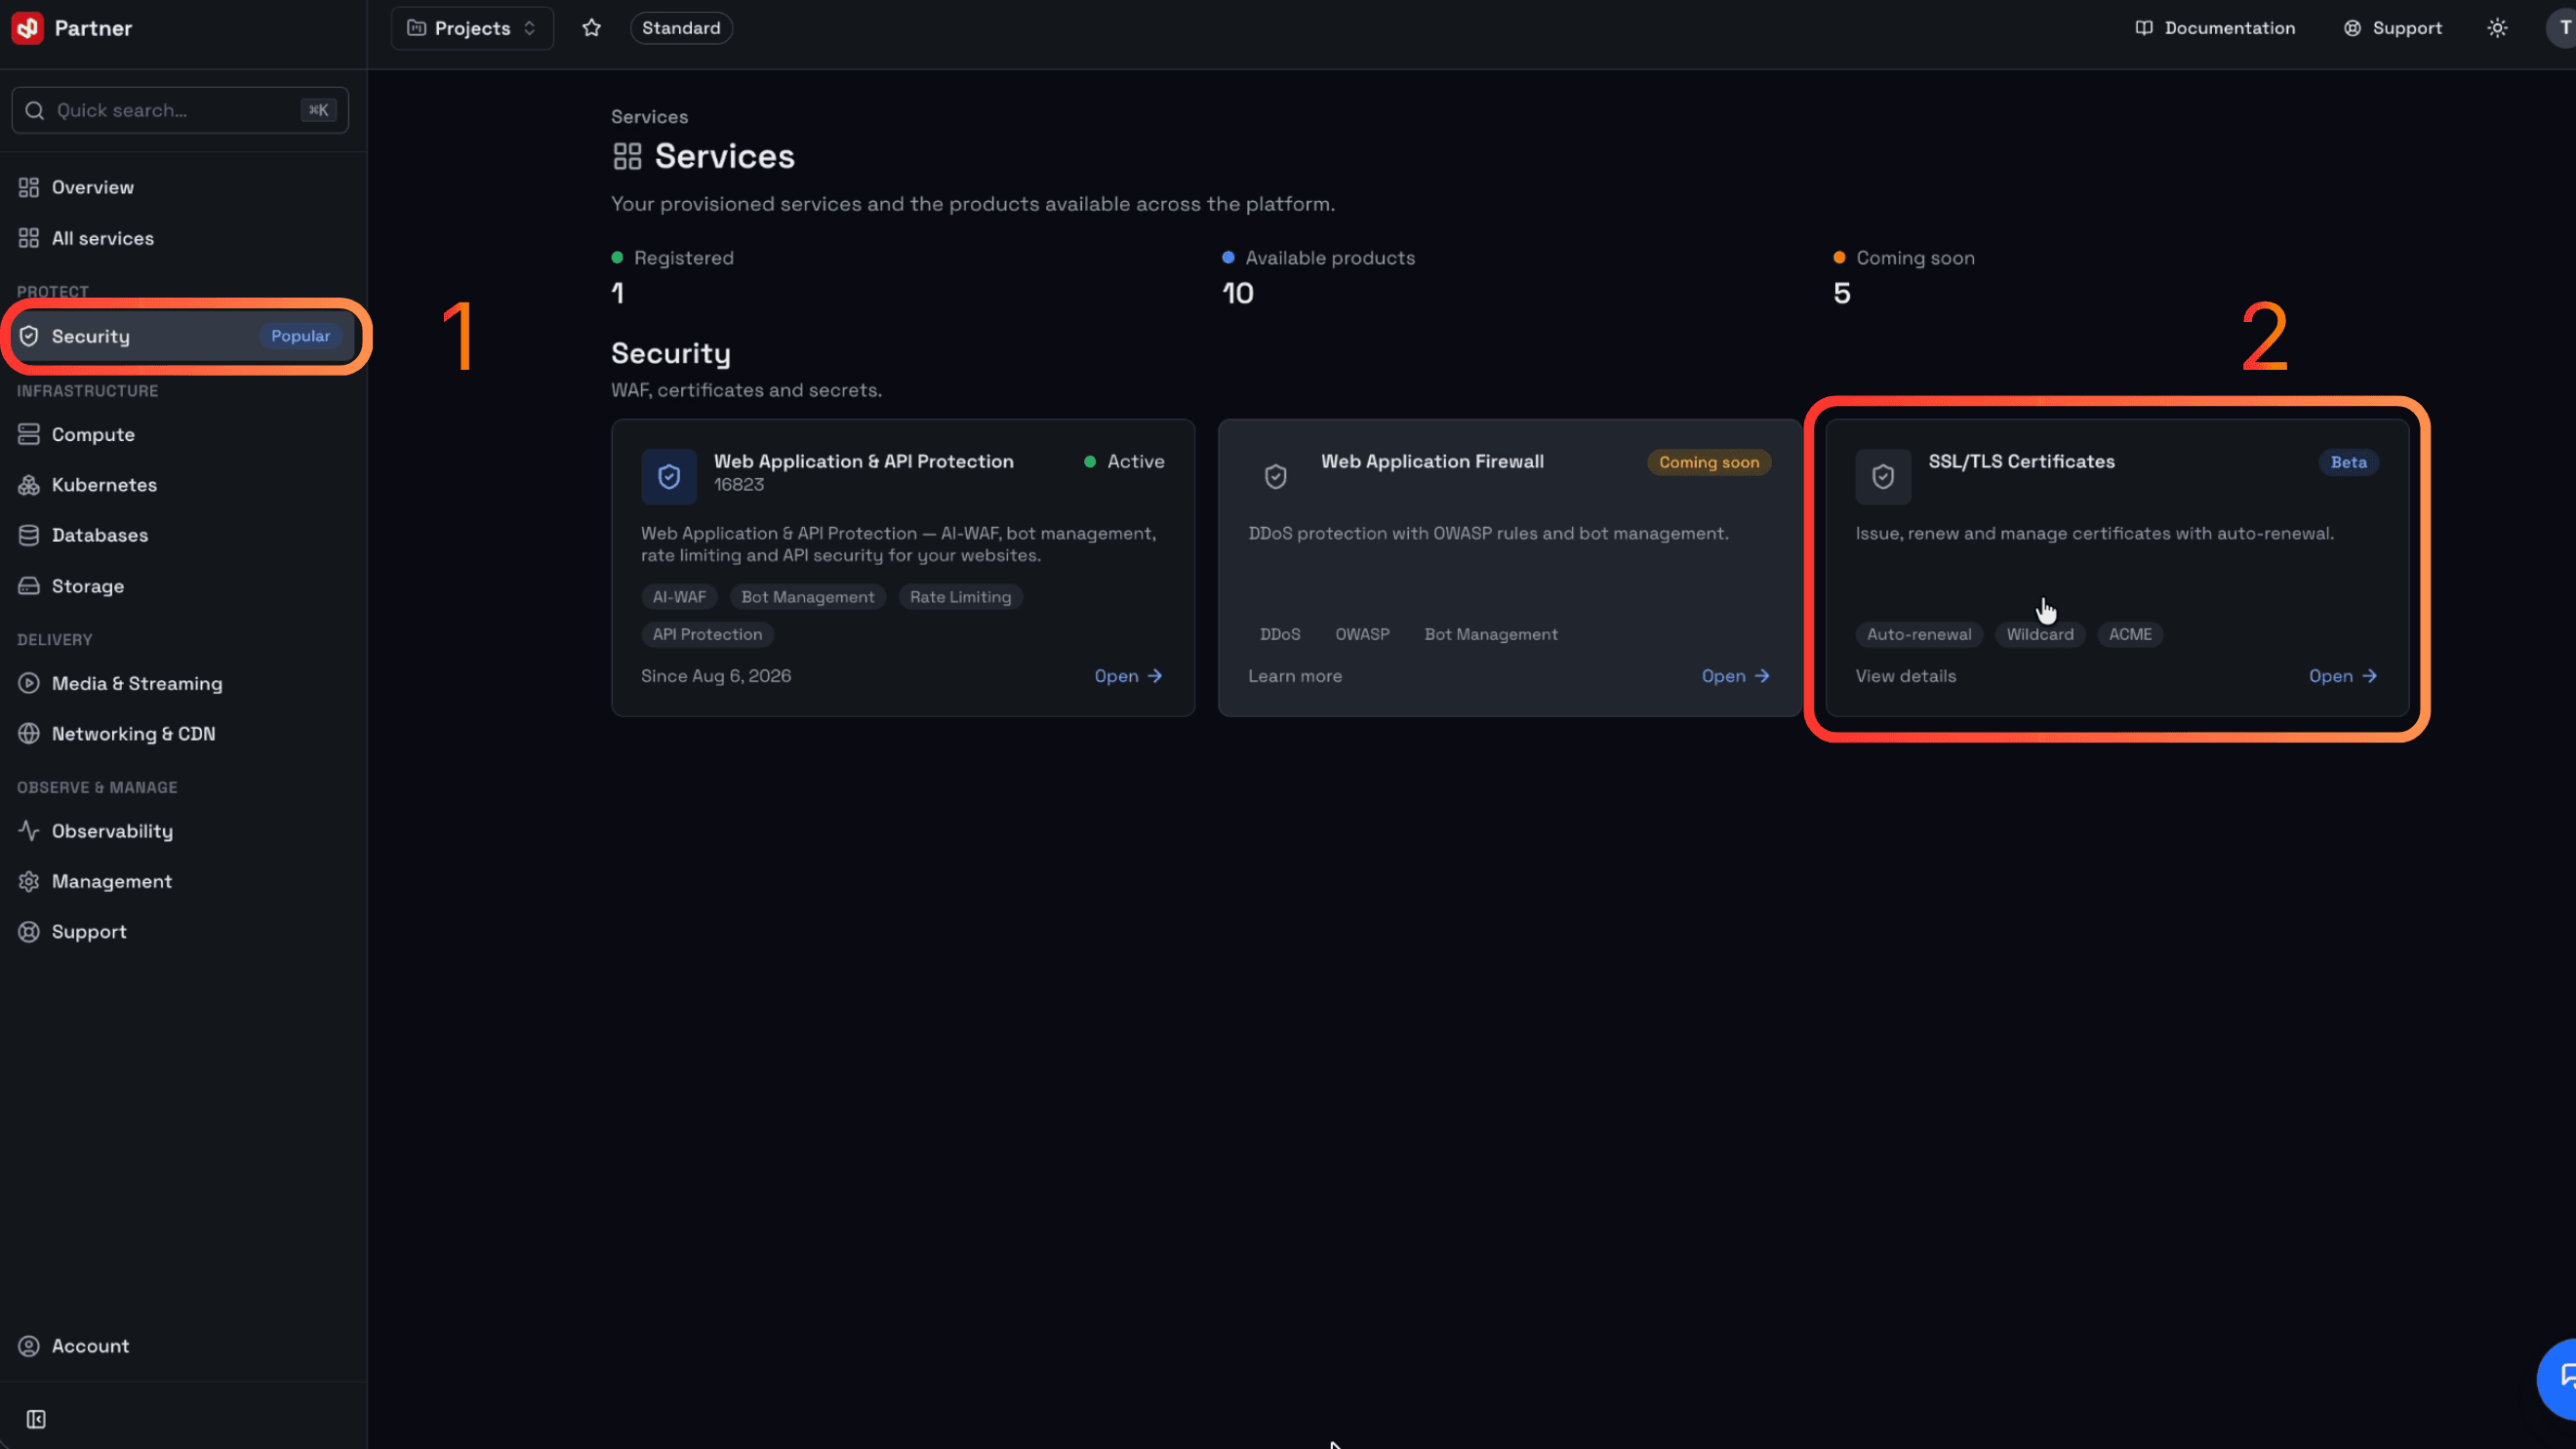
Log in to the VNETWORK Partner Portal and go to Security in the left navigation bar. In the list of services under Security, select Web Application & API Protection, then click Open to enter the management console.
If this is your first time using the service, the system will take you directly to the Onboarding wizard to declare your website and activate protection following the steps below. The exact process differs depending on whether the website already has an SSL certificate.
Activate WAF Free, a free website security solution, right now!
Watch the video below for a step-by-step walkthrough of the WAF Free activation process.
3. If the customer does not have SSL and uses SSL Free
Step 1: Declare Domain and Origin
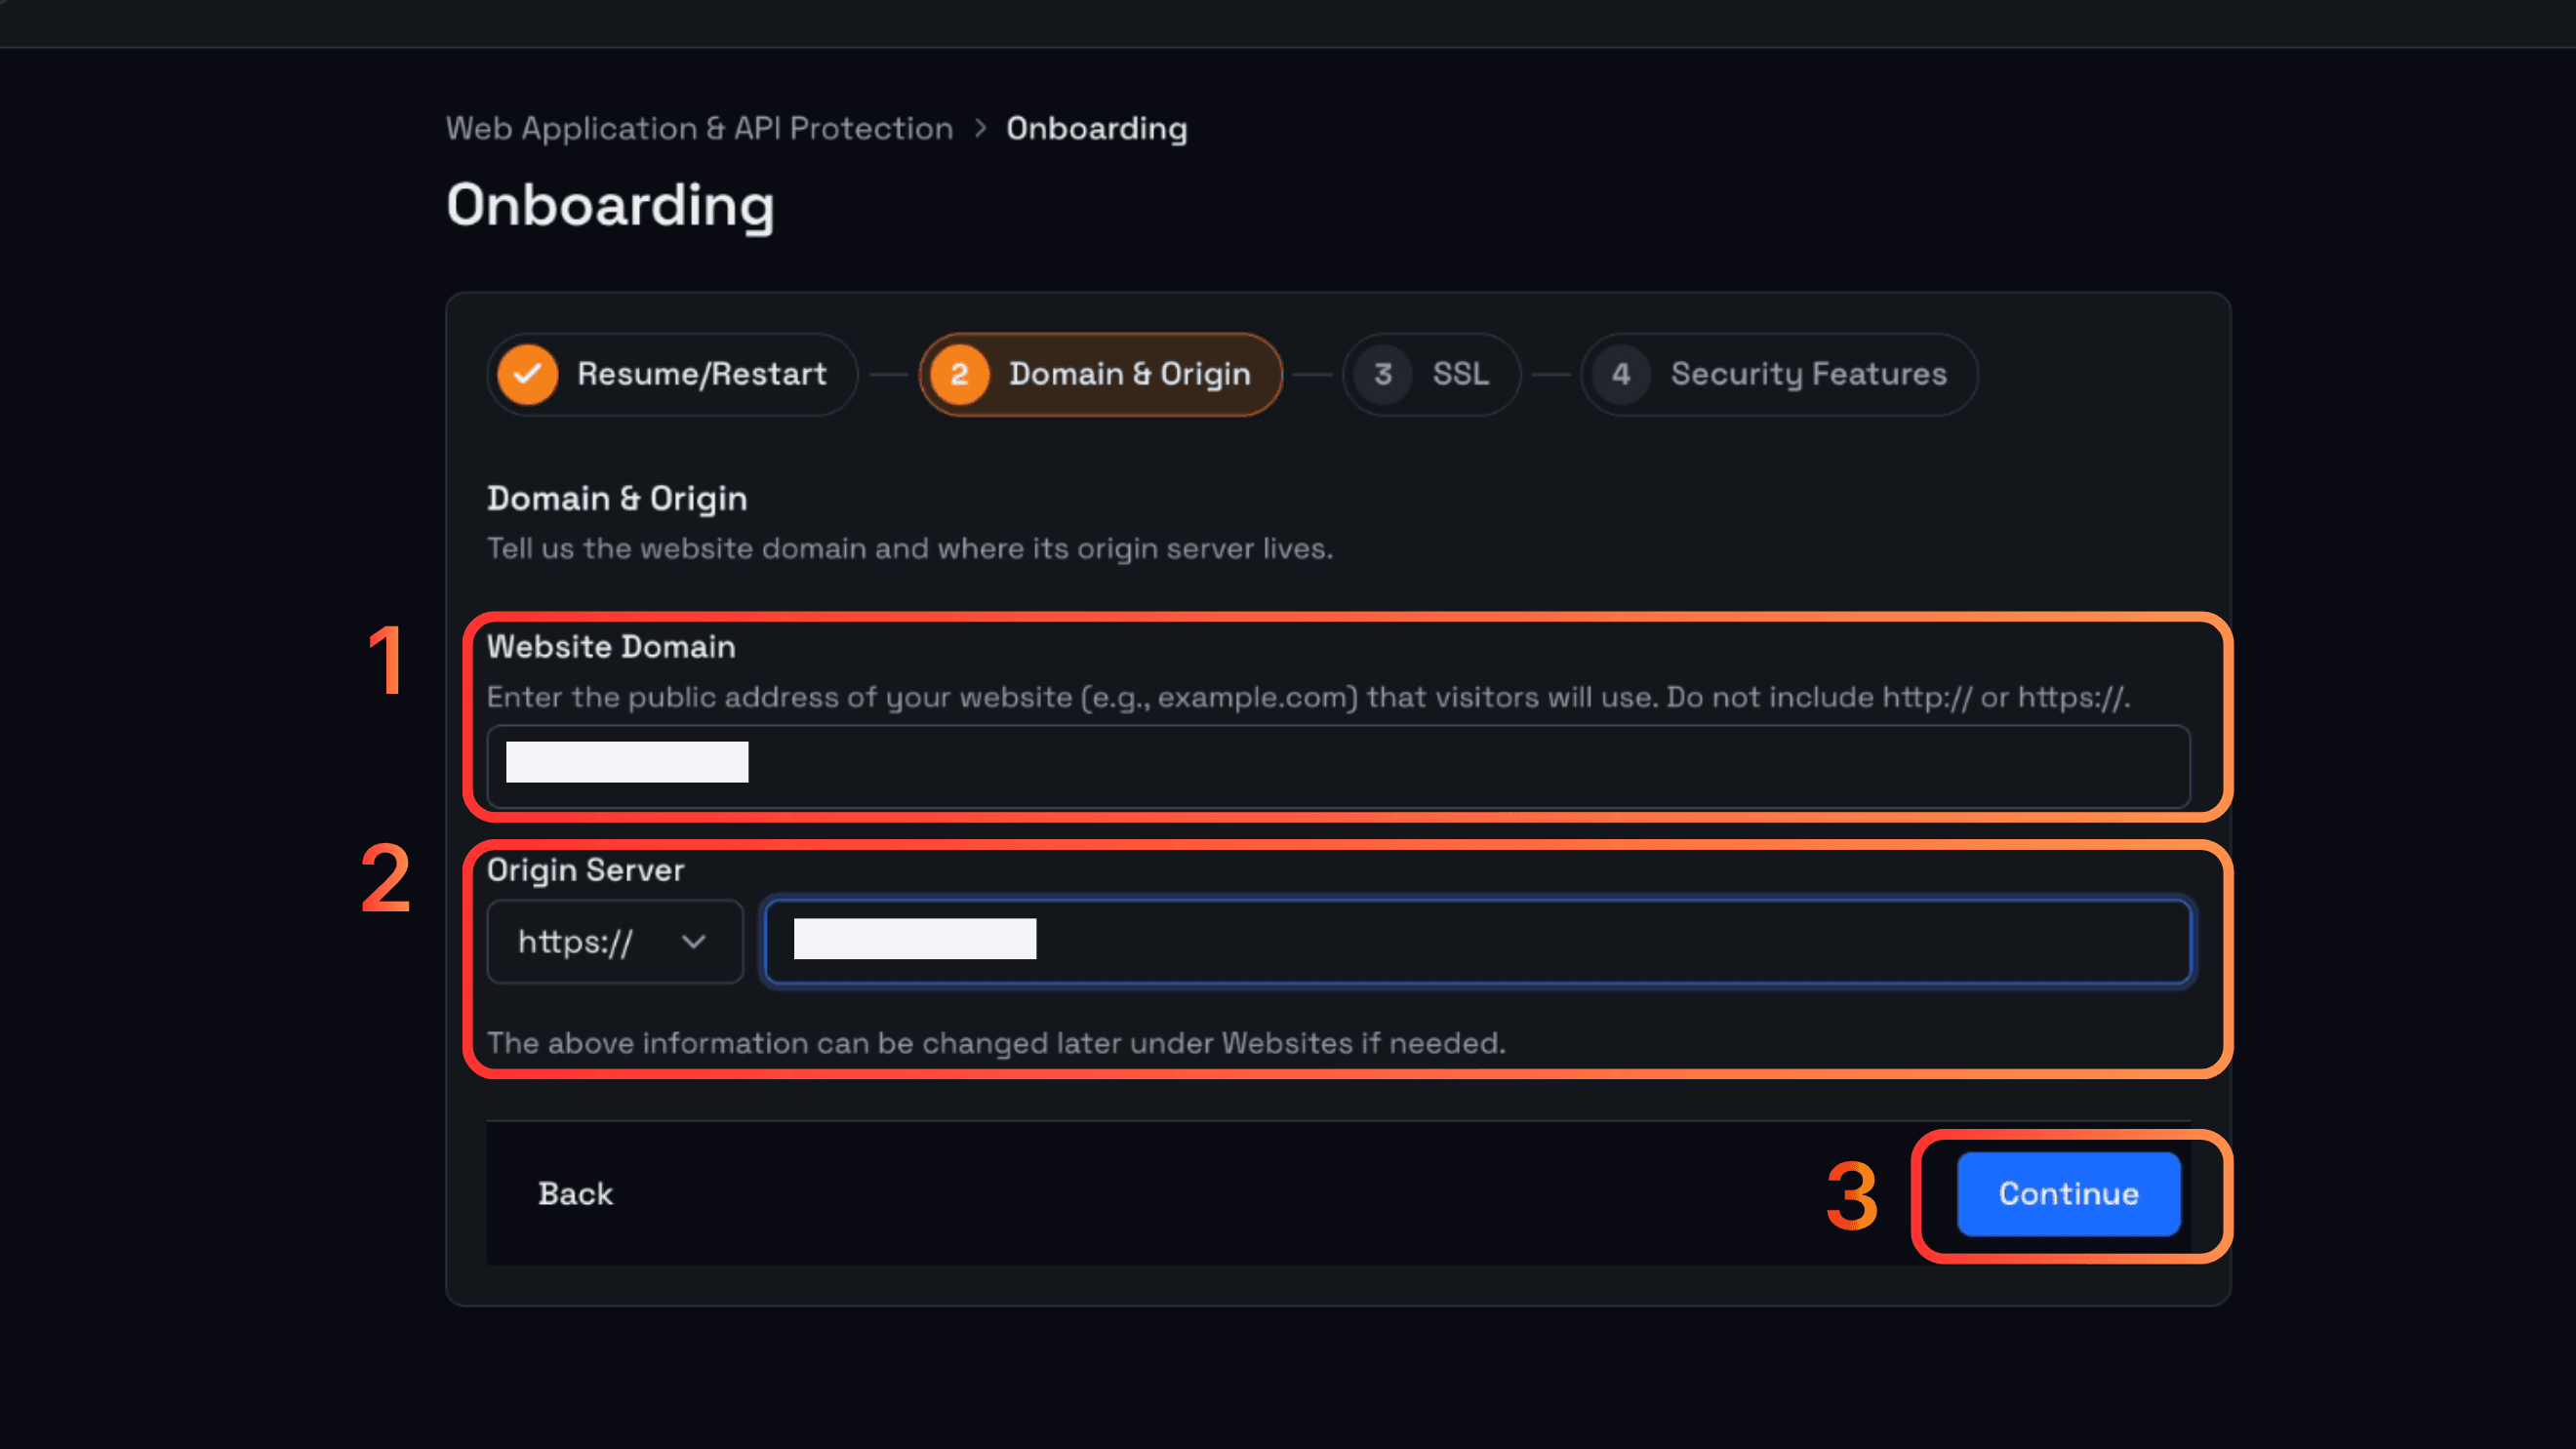
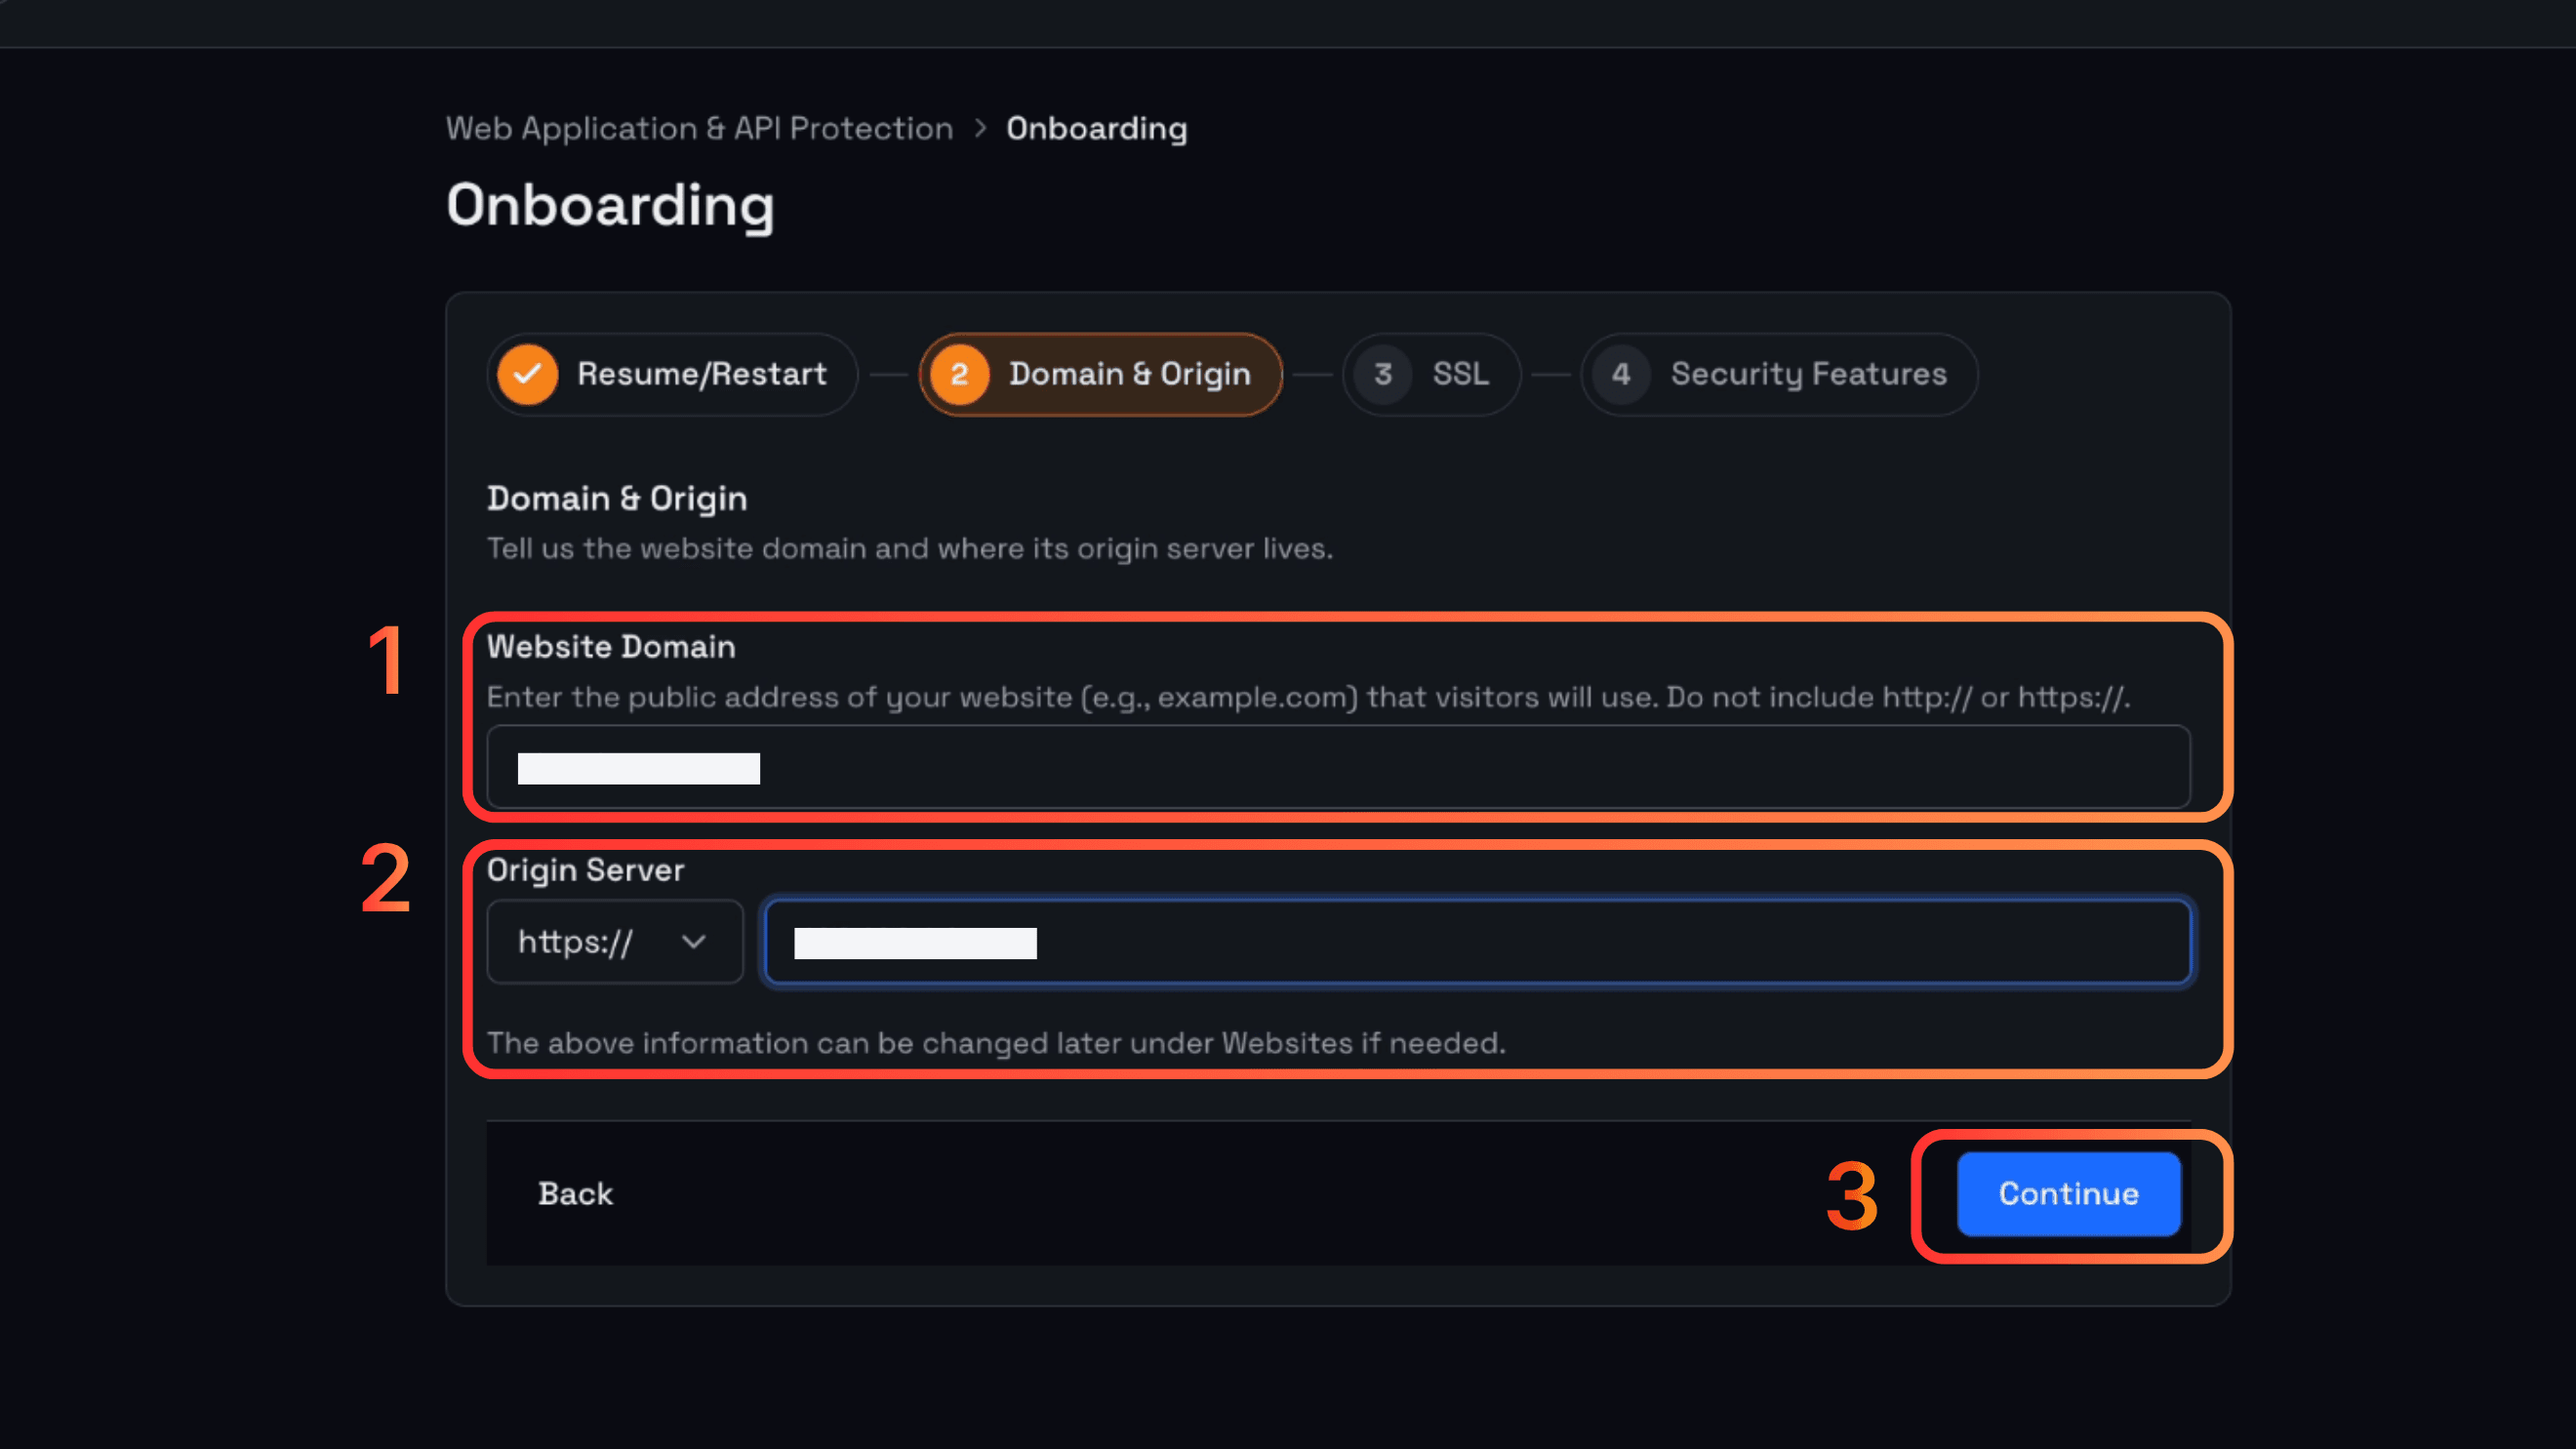
Enter Website Domain, the public address that users will access (for example, example.com), without http:// or https://.
Enter Origin Server, choose the http:// or https:// scheme from the dropdown depending on the customer's actual configuration, then enter the IP address or domain of the origin server (IPv6 is not yet supported).
Note: The declared domain must not be the same as the CDN domain. Information entered at this step can be edited later in the Websites section if needed.
Step 2: Configure SSL
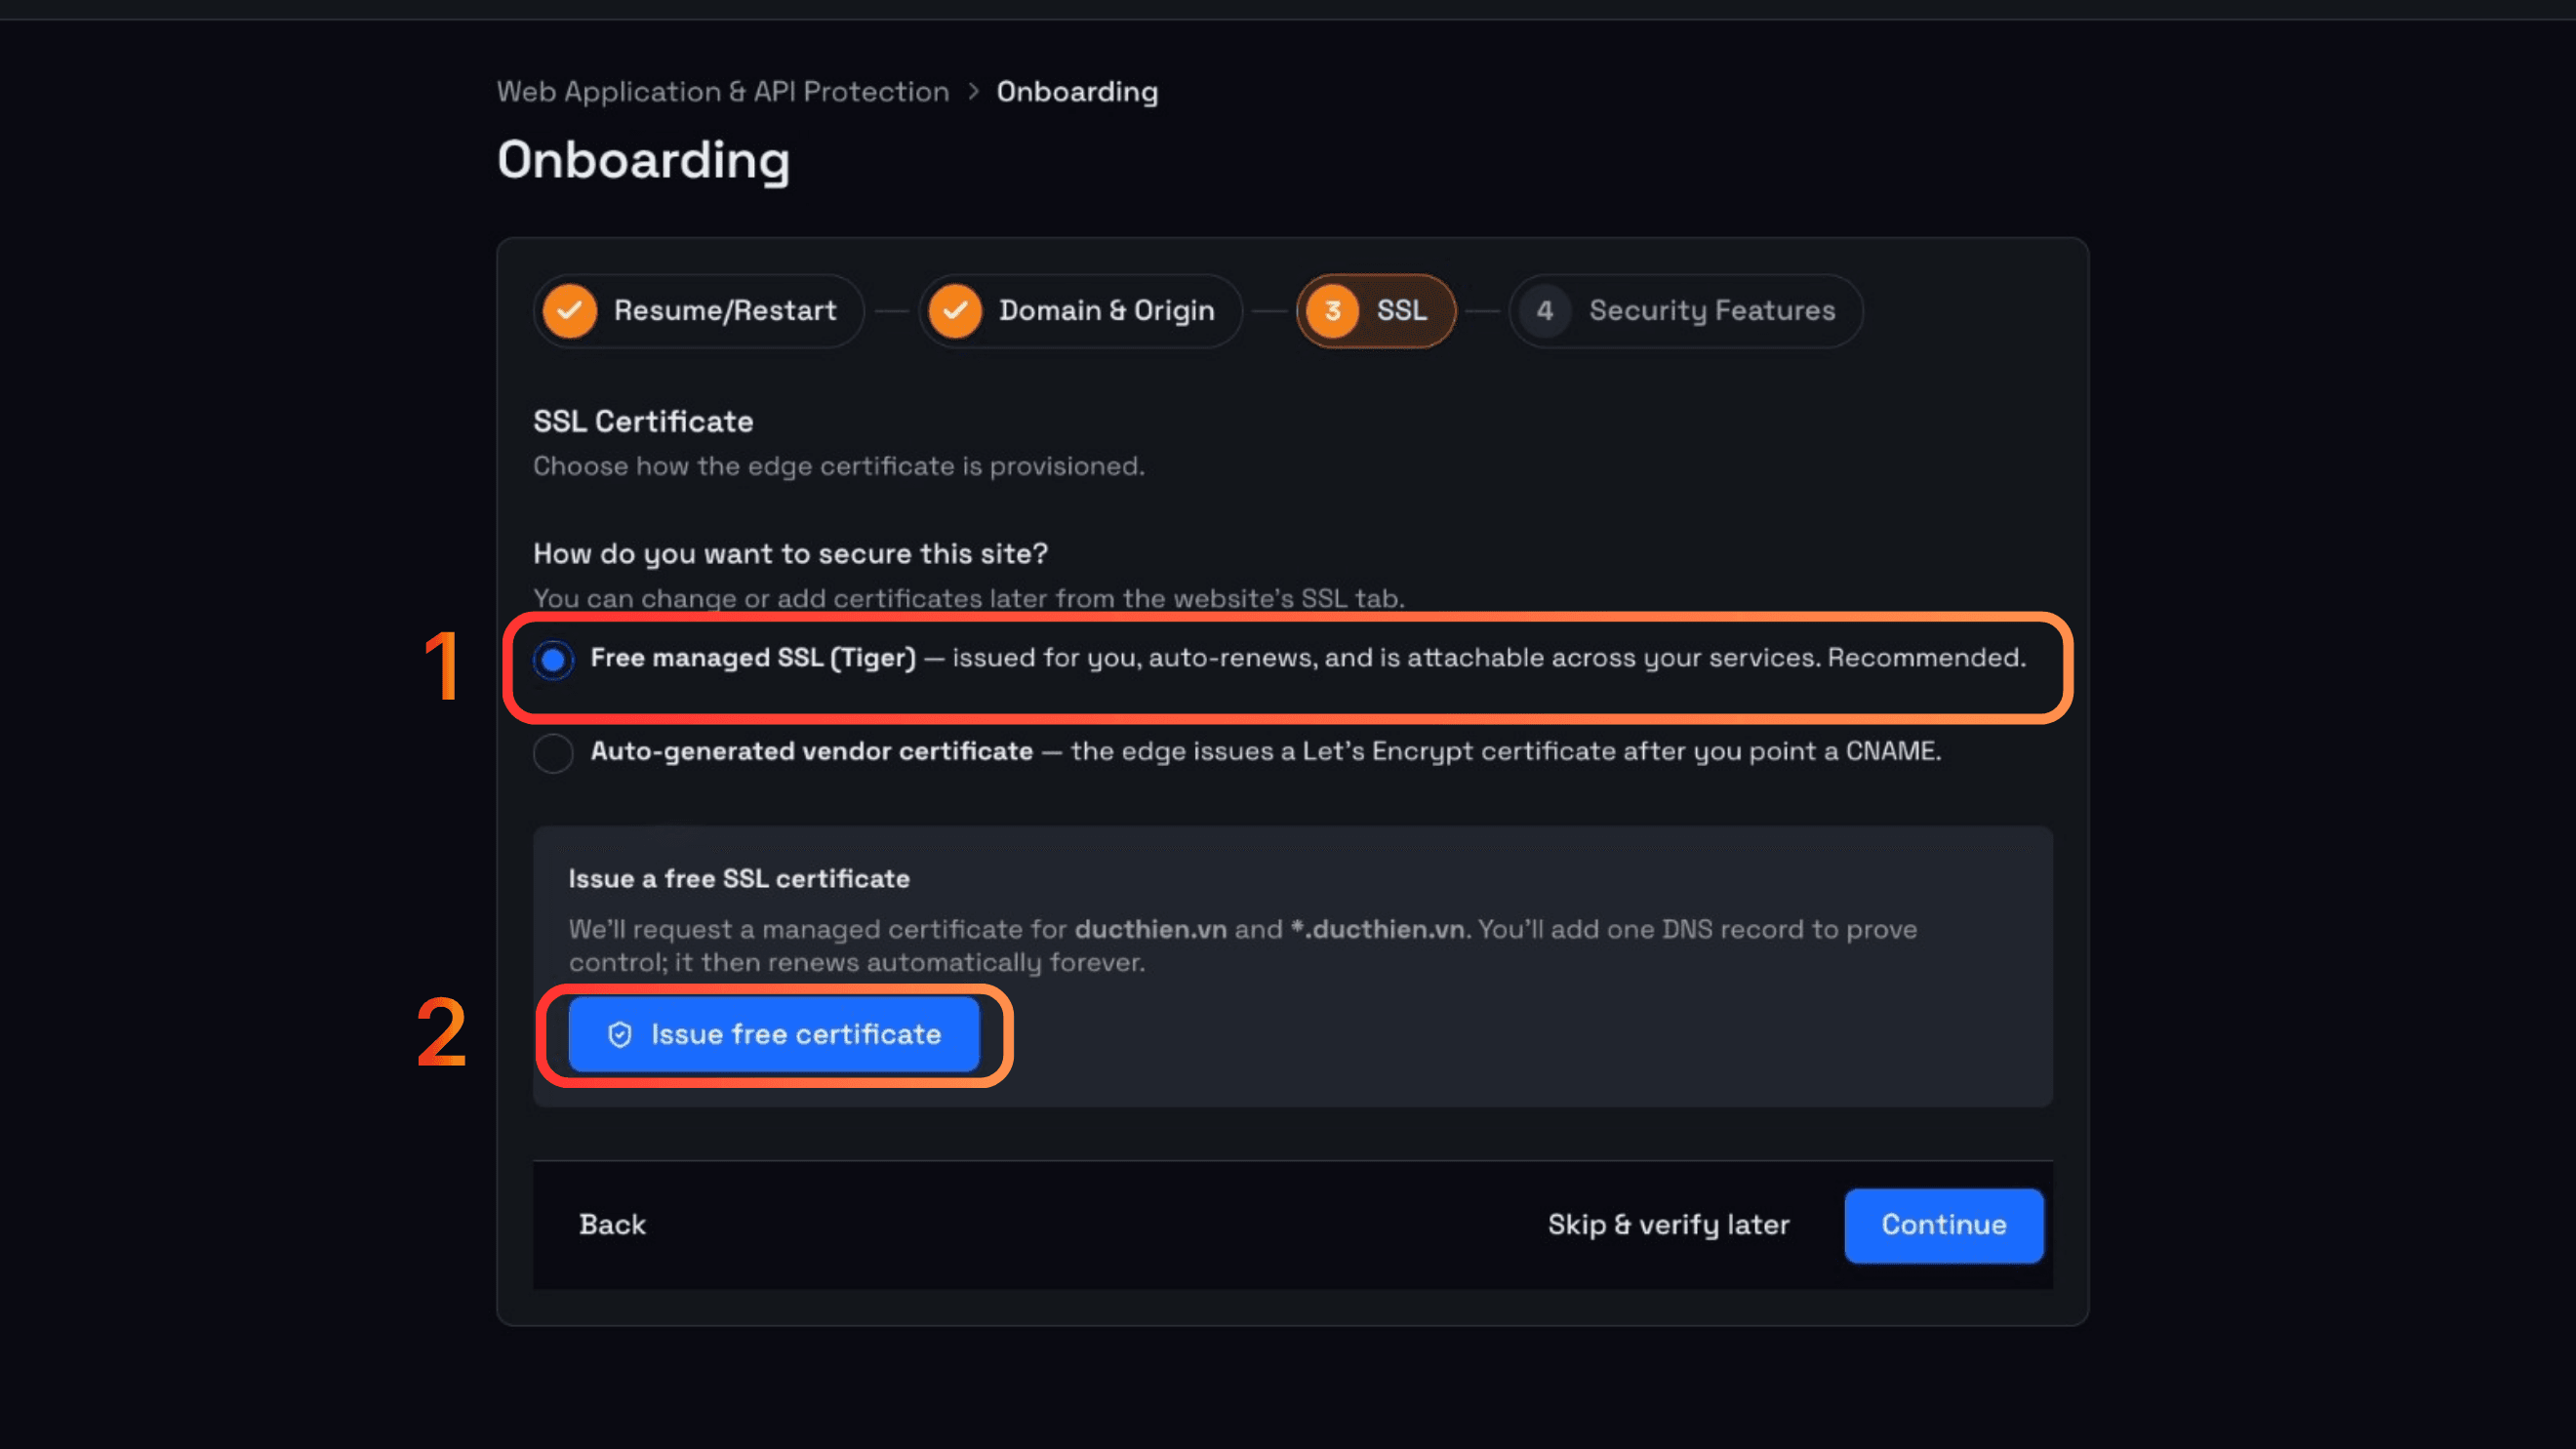
Select Free managed SSL. VNETWORK will automatically issue a TLS certificate for the website, renew it permanently, and it can be shared across multiple other services.
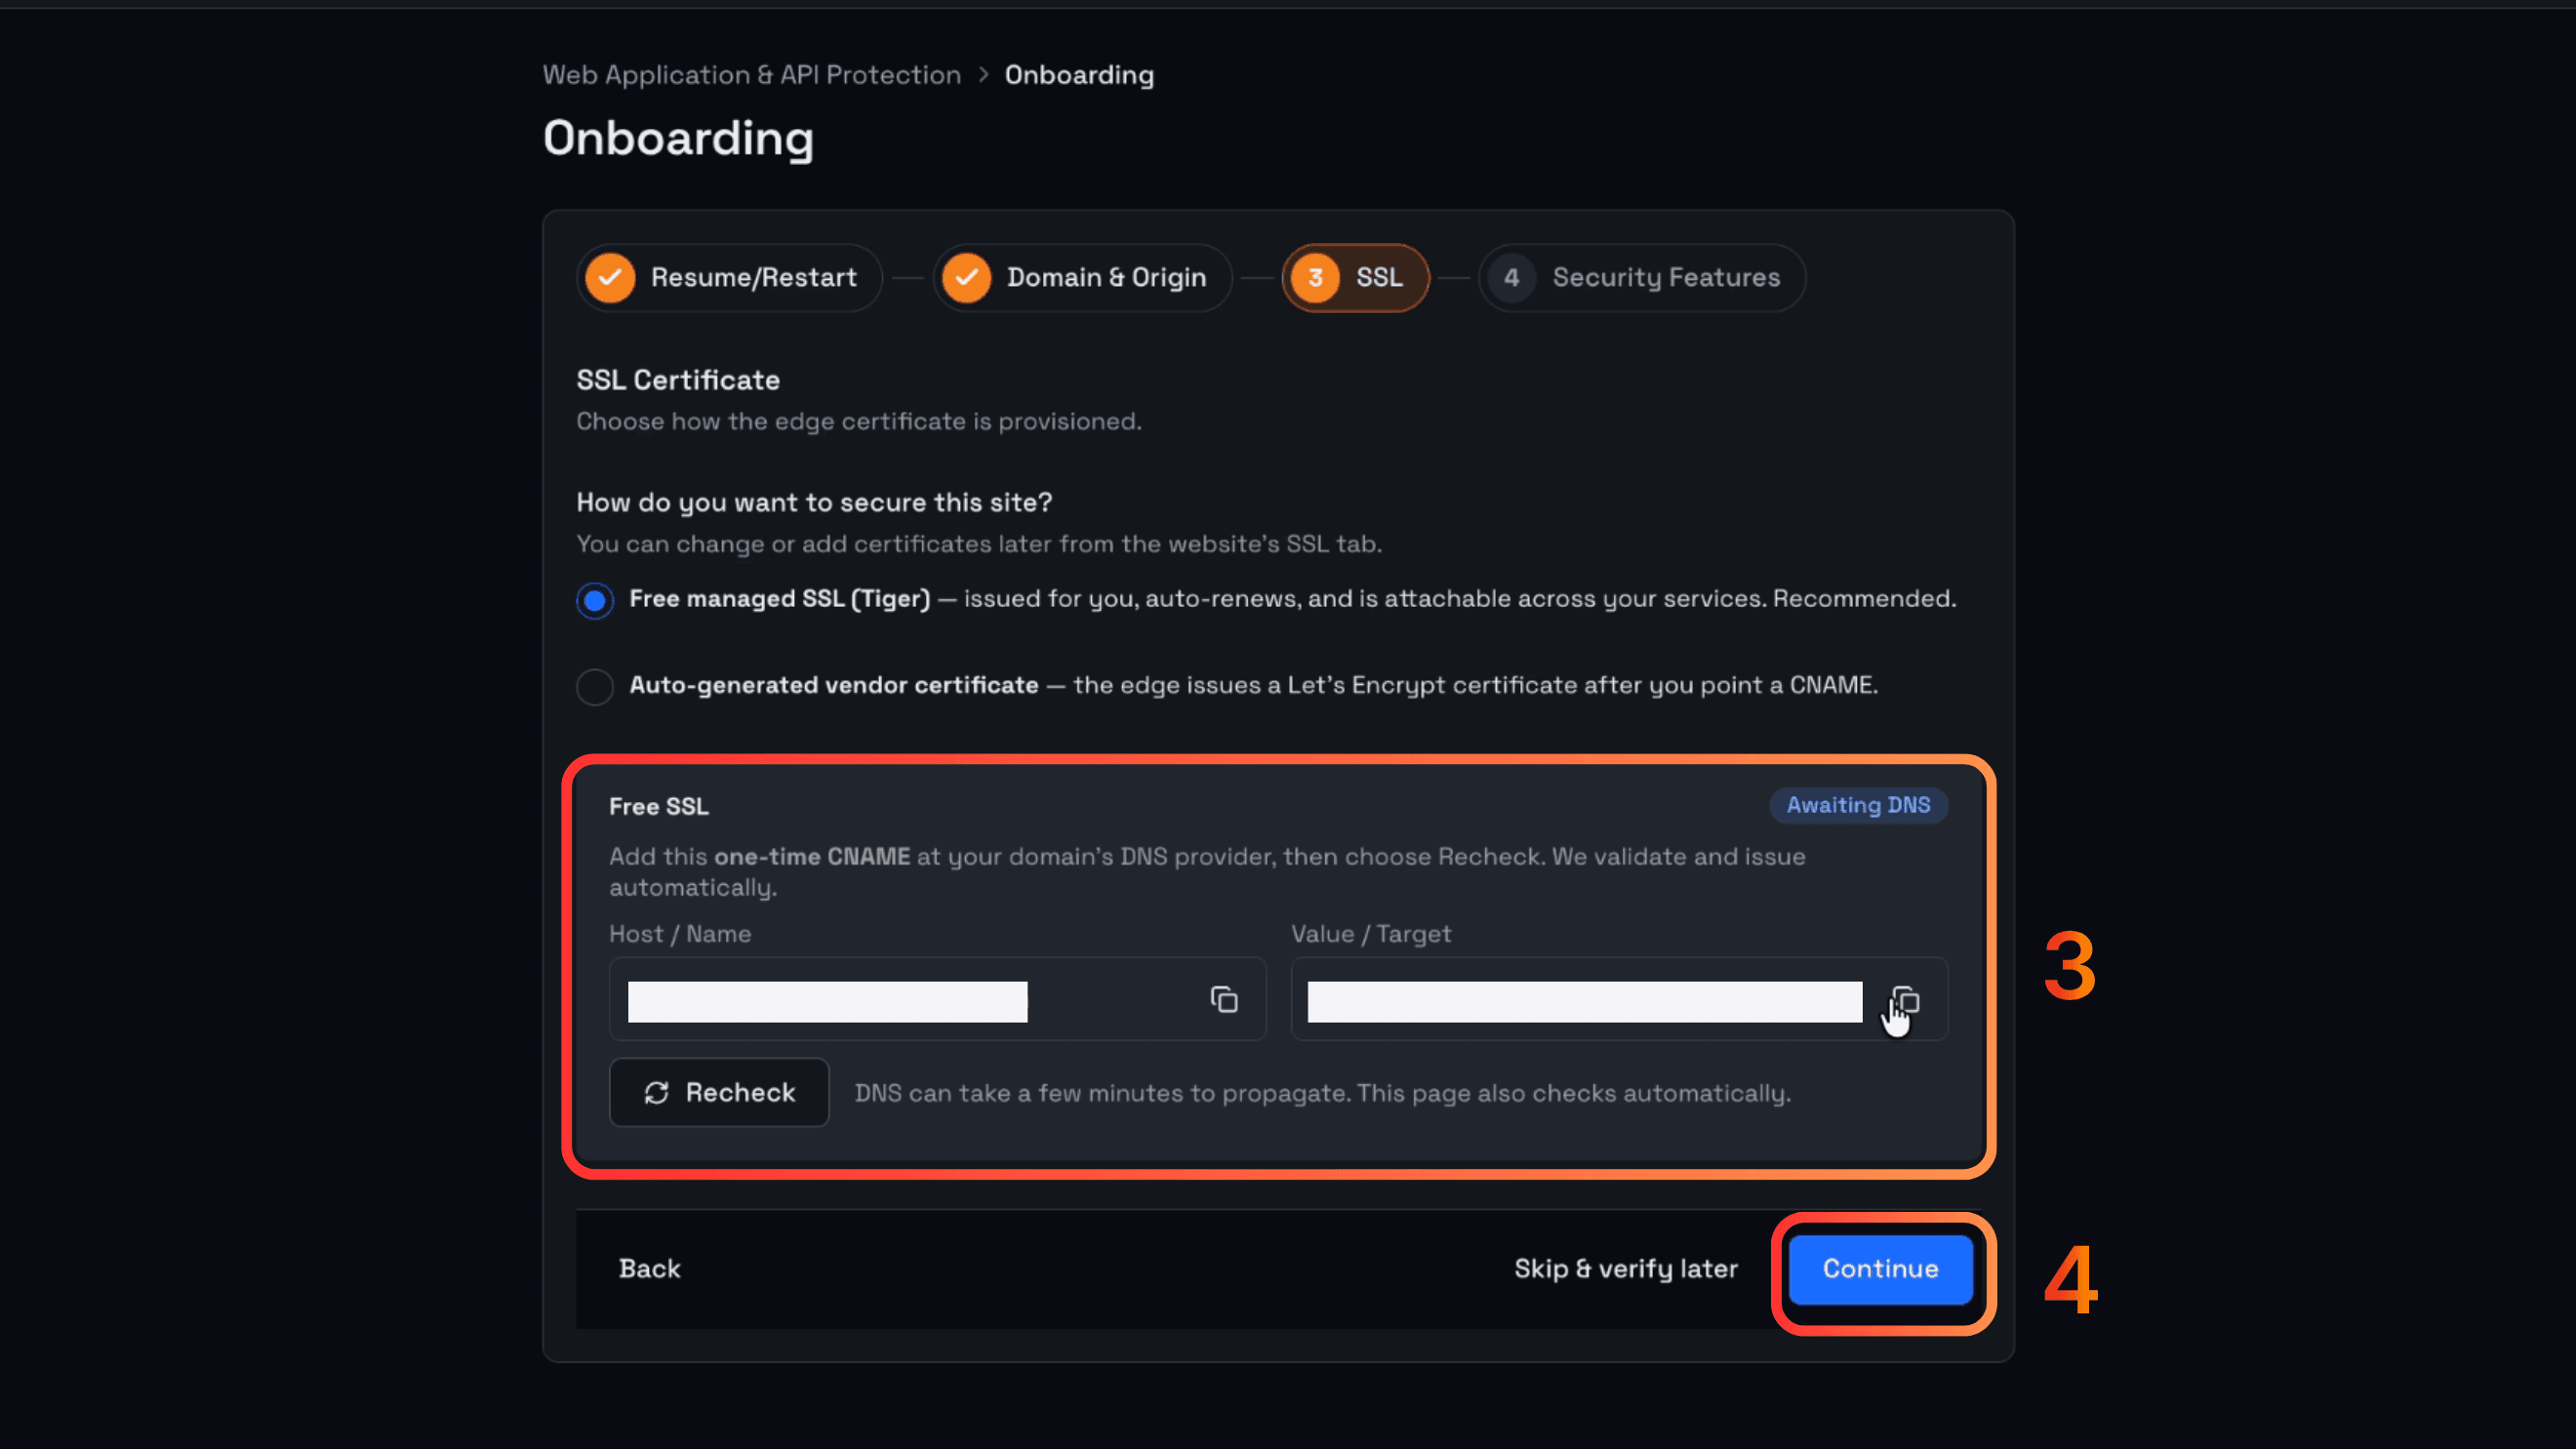
Click Issue free certificate. The system will request a certificate for the declared domain and return a DNS record to verify ownership. The customer only needs to add this record to the DNS system currently managing the domain.
Note: The certificate can be changed or a new one added later in the website's SSL tab.
Step 3: Activate WAF
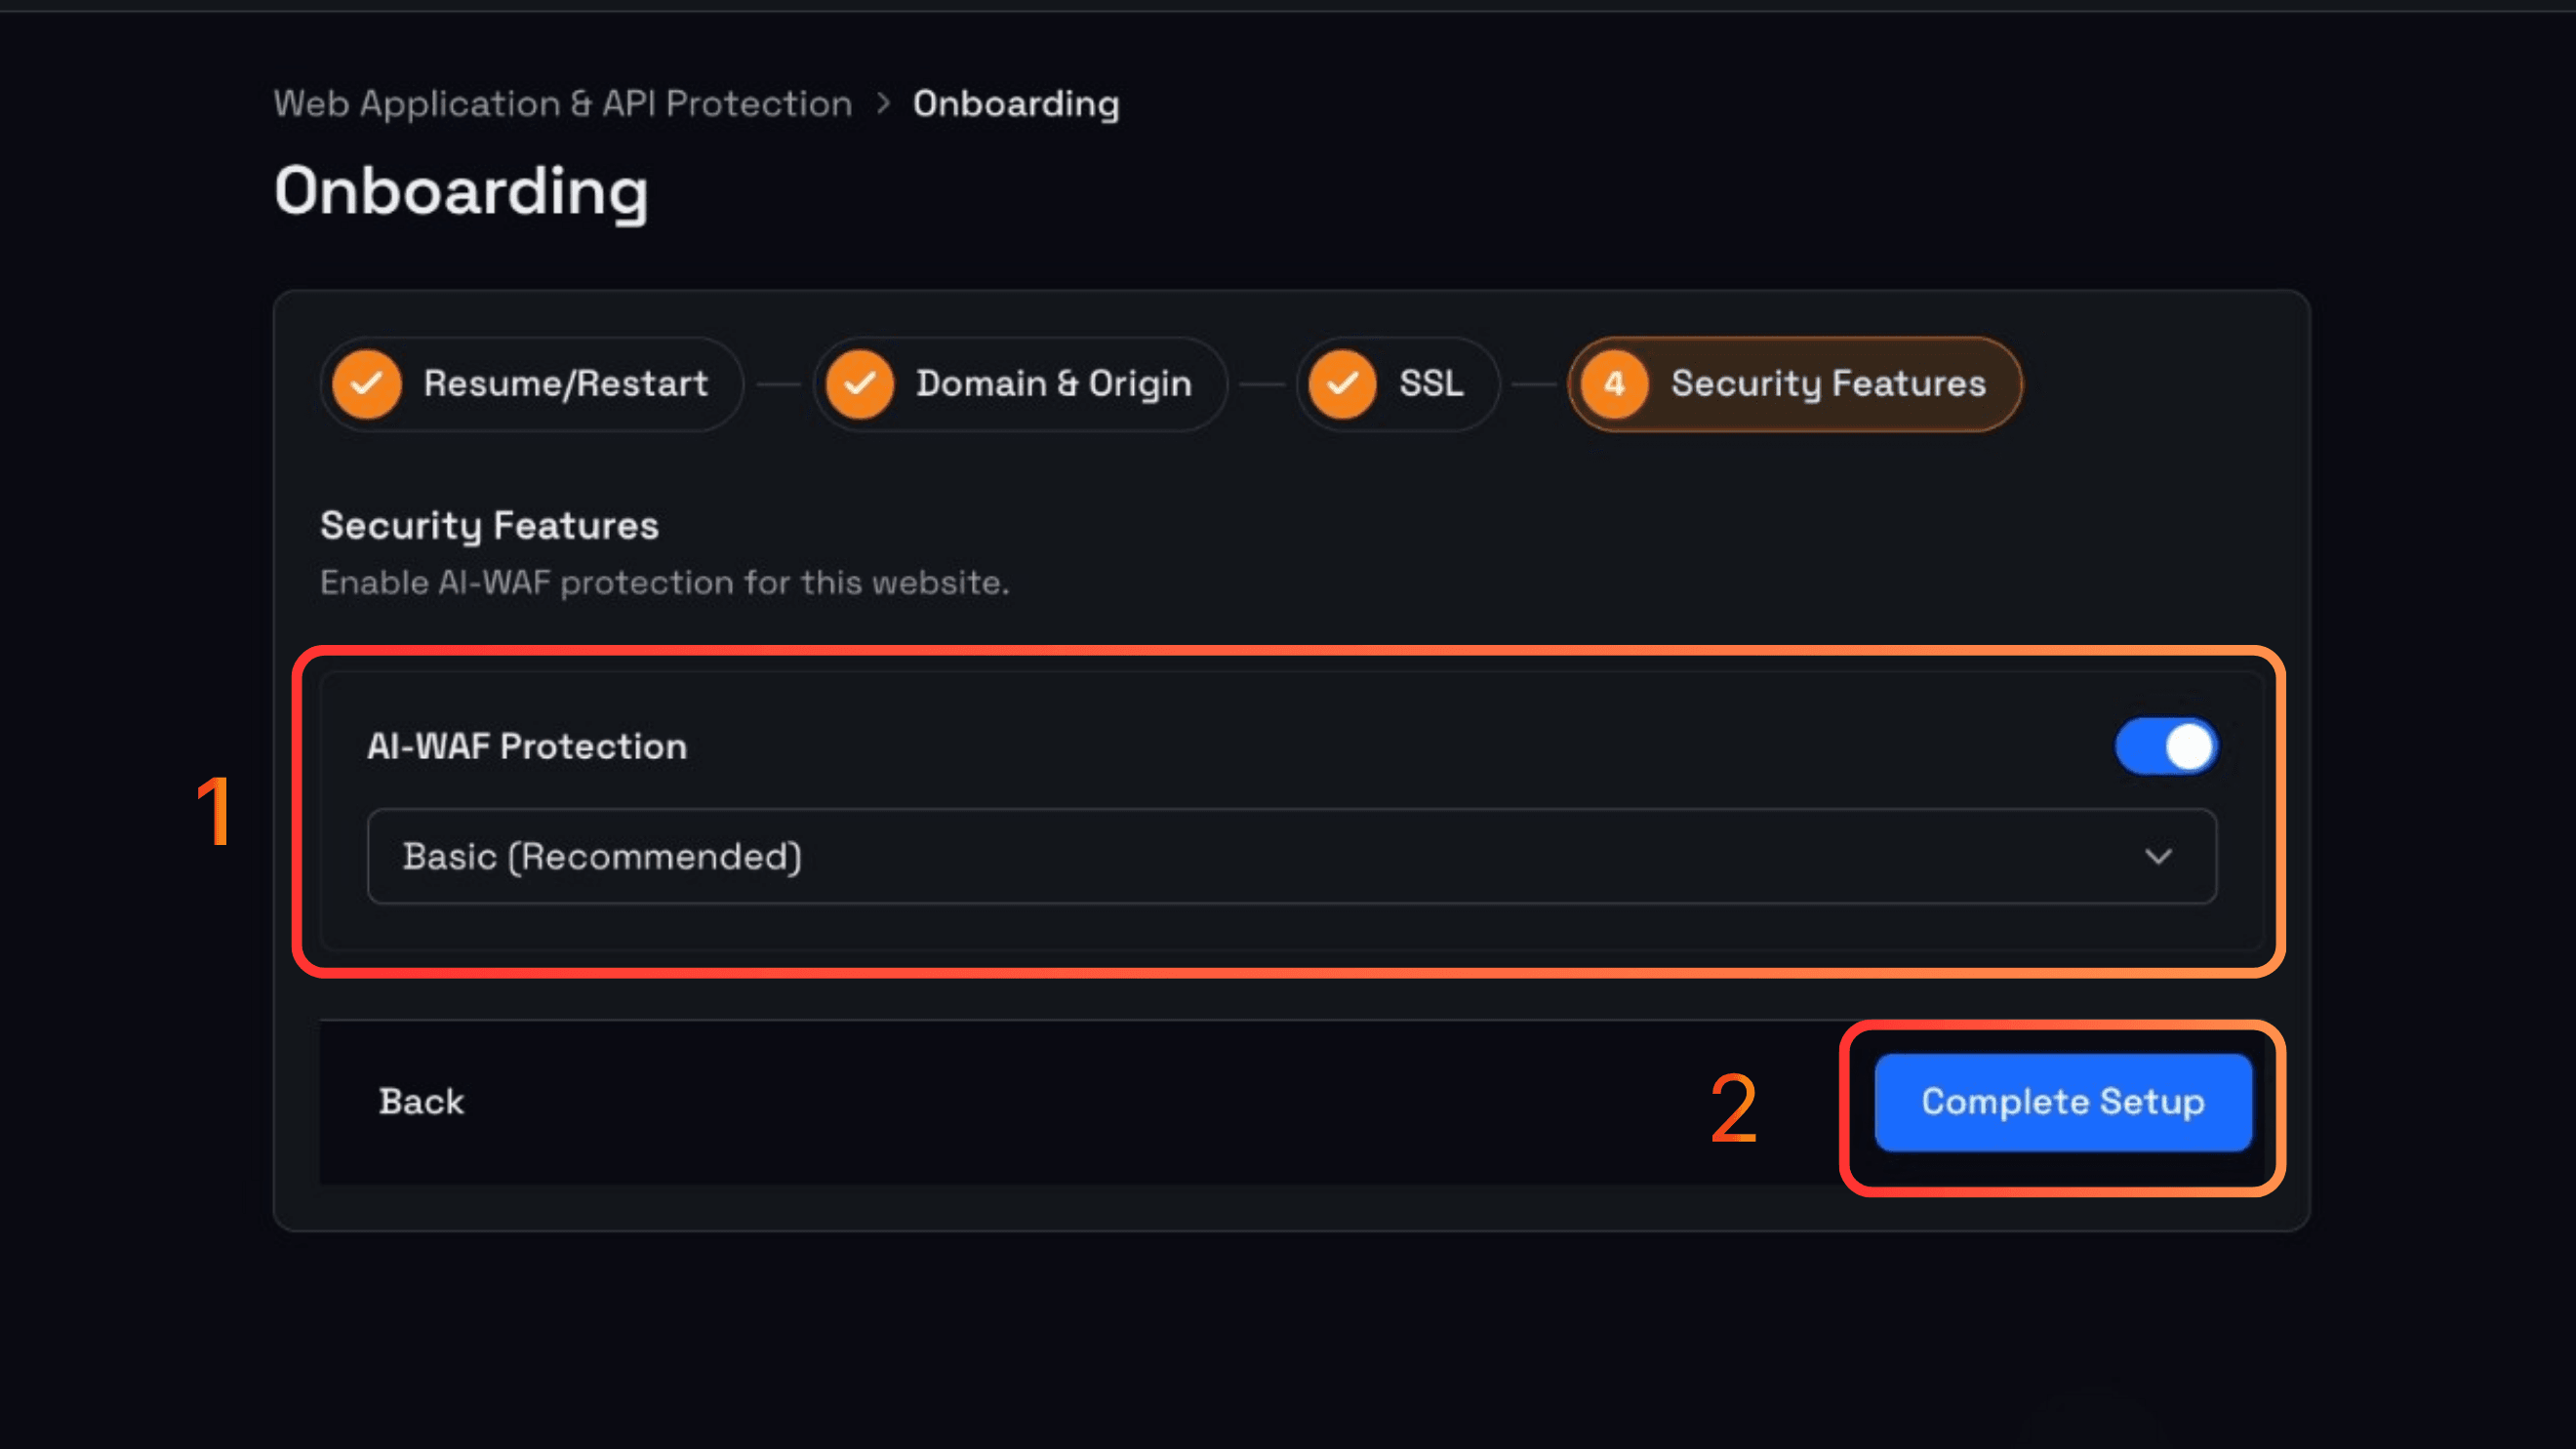
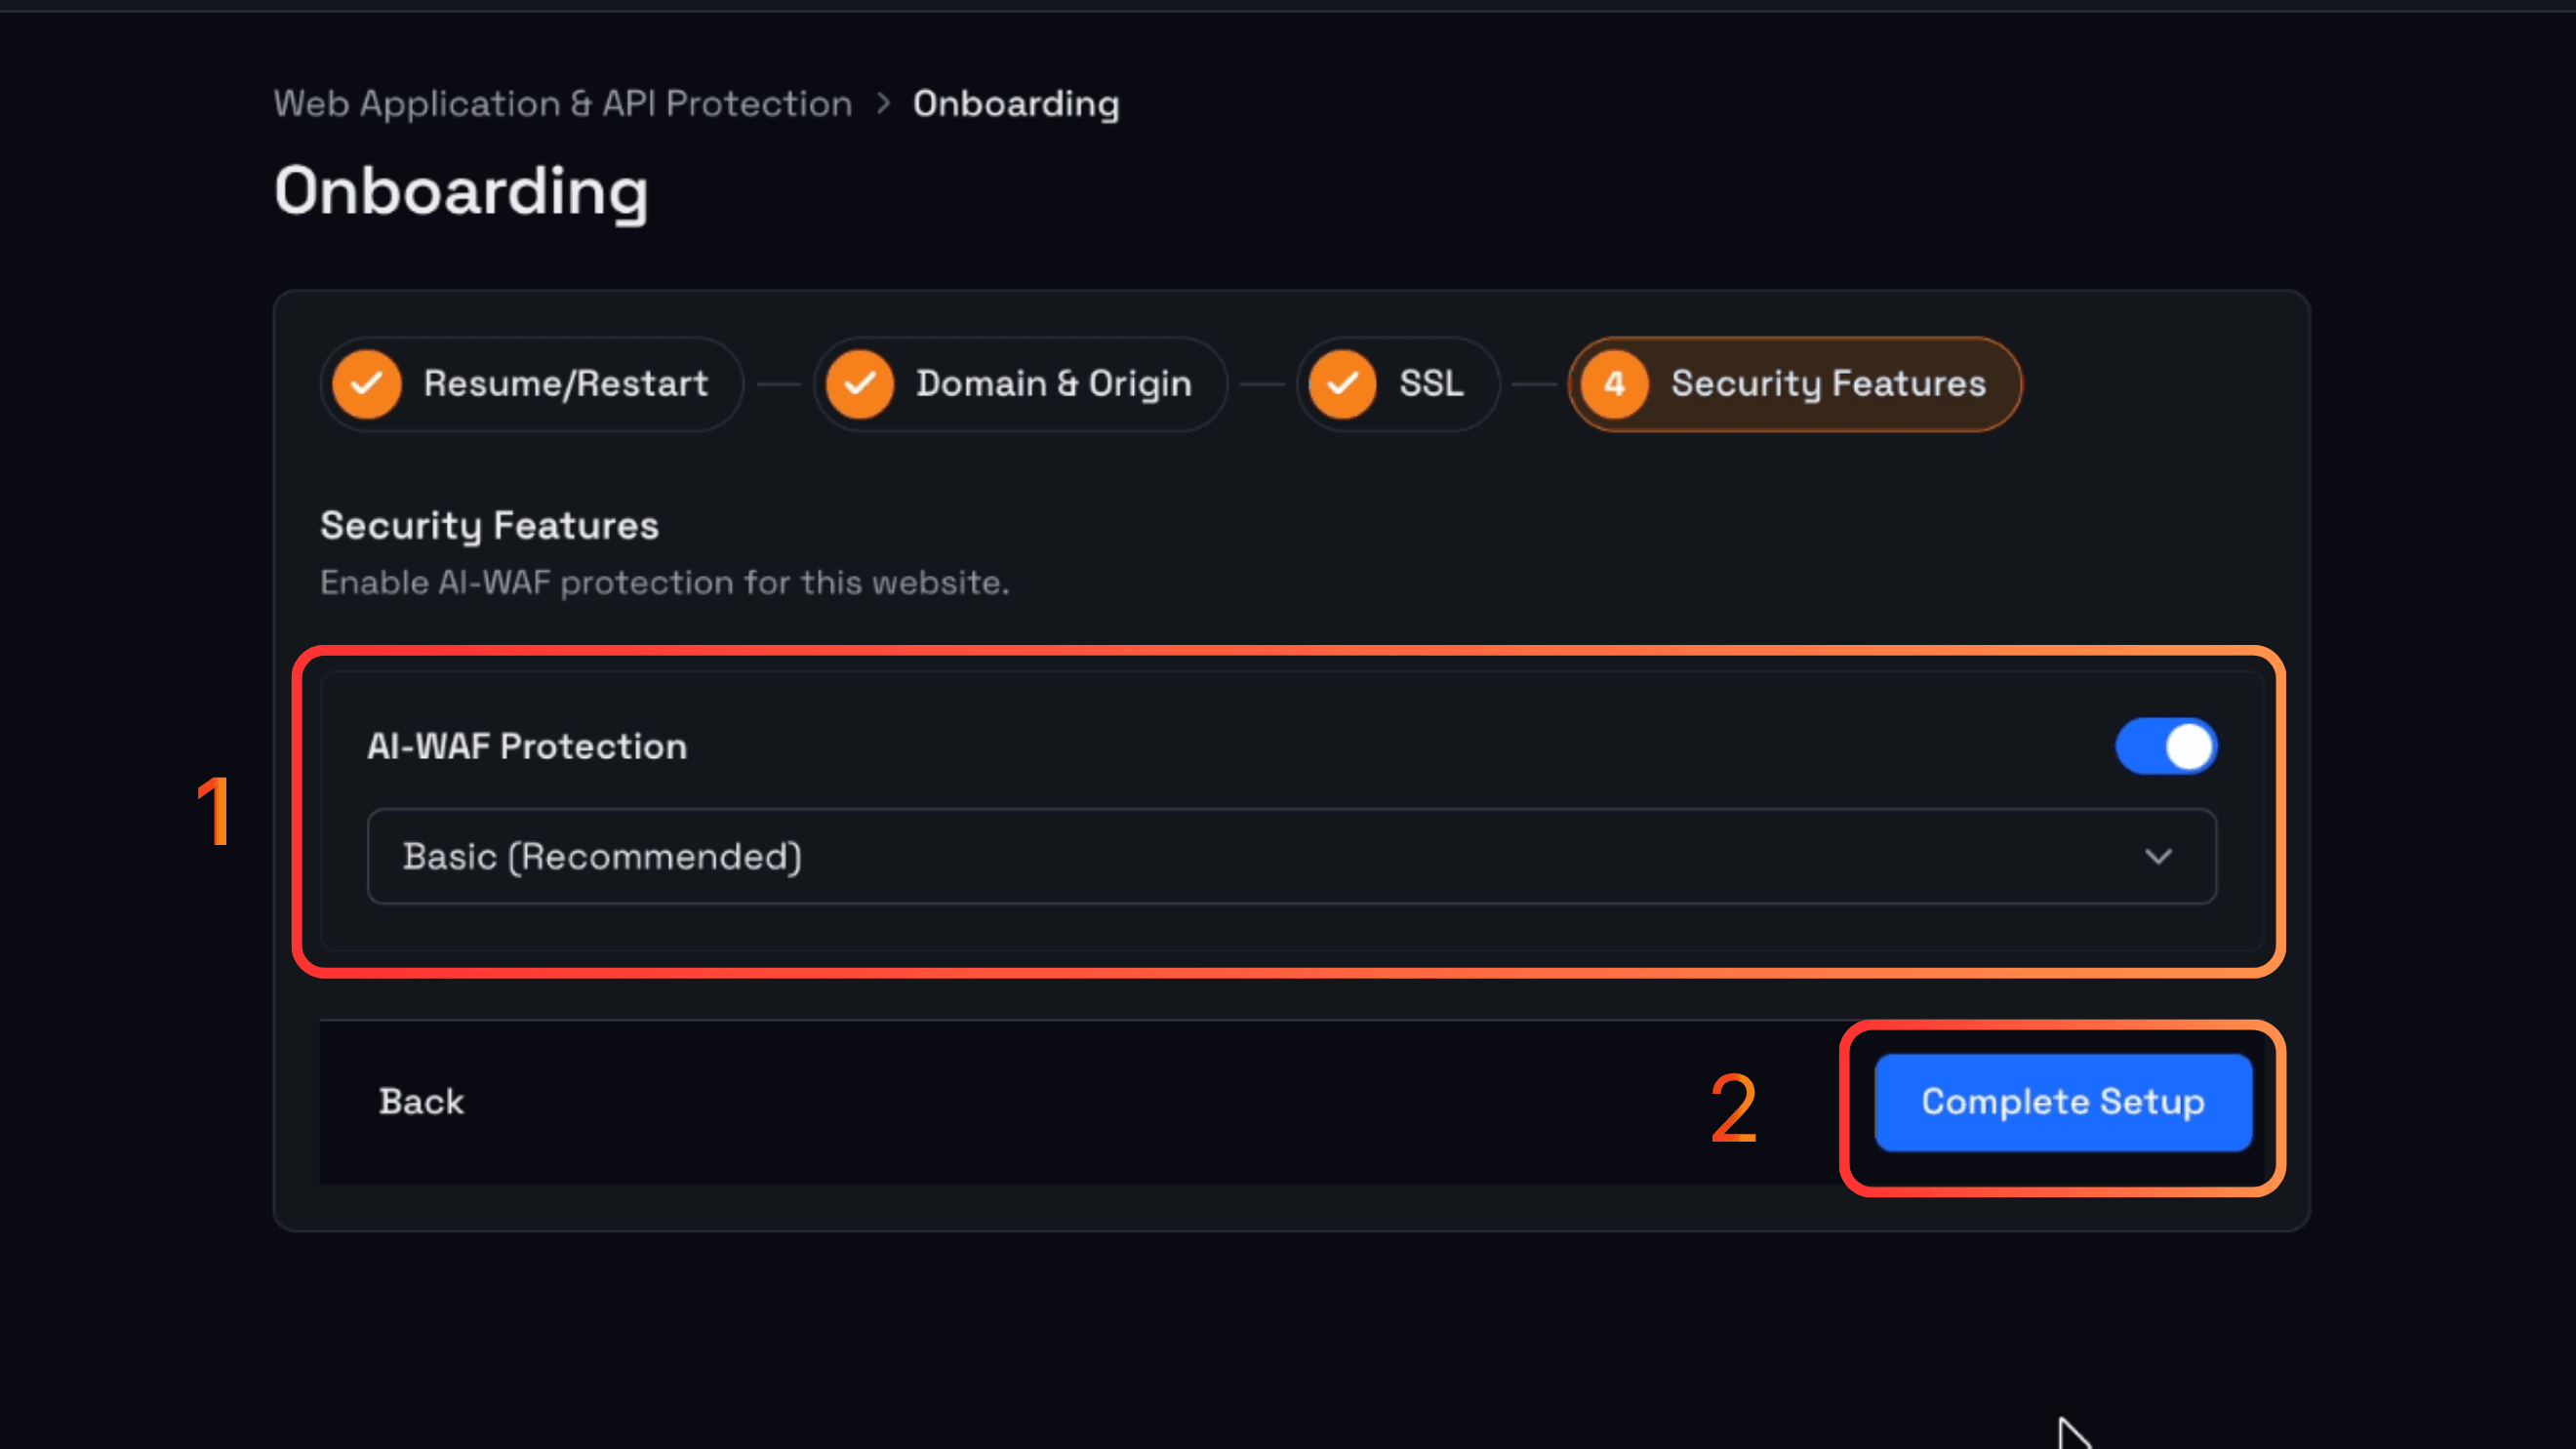
At the Security Features step, select the AI WAF Basic protection level, then complete the onboarding wizard.
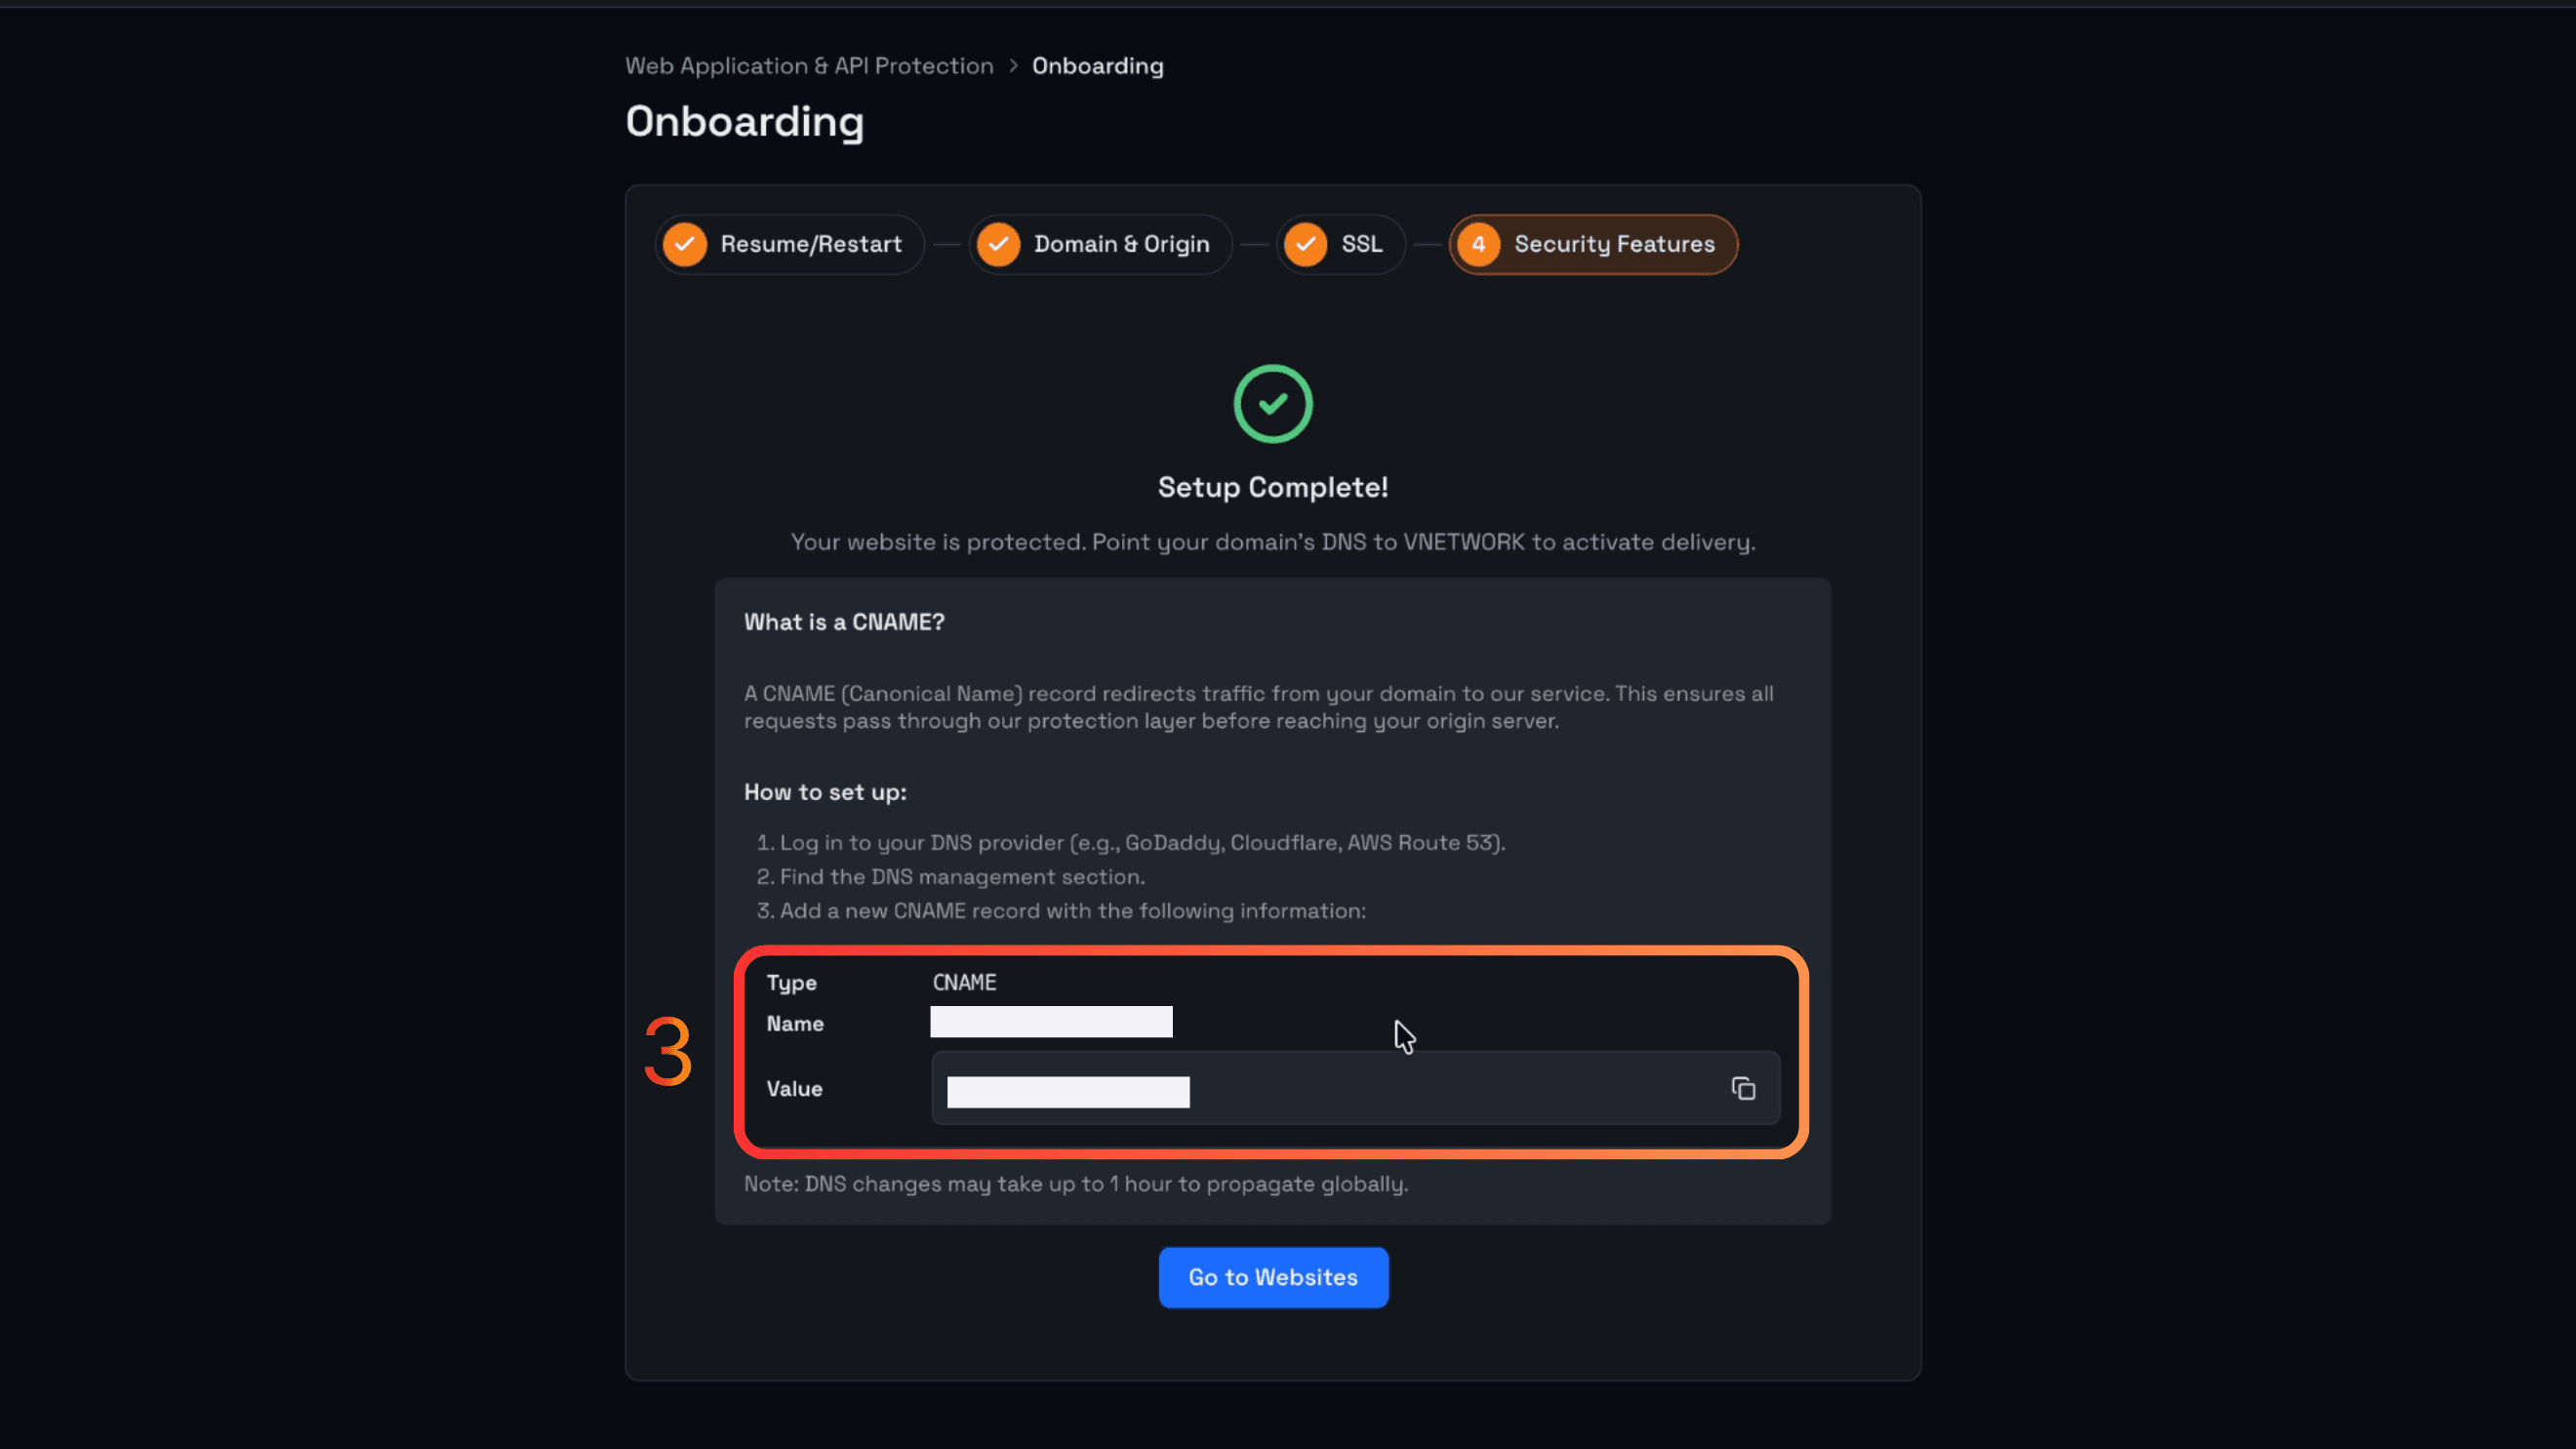
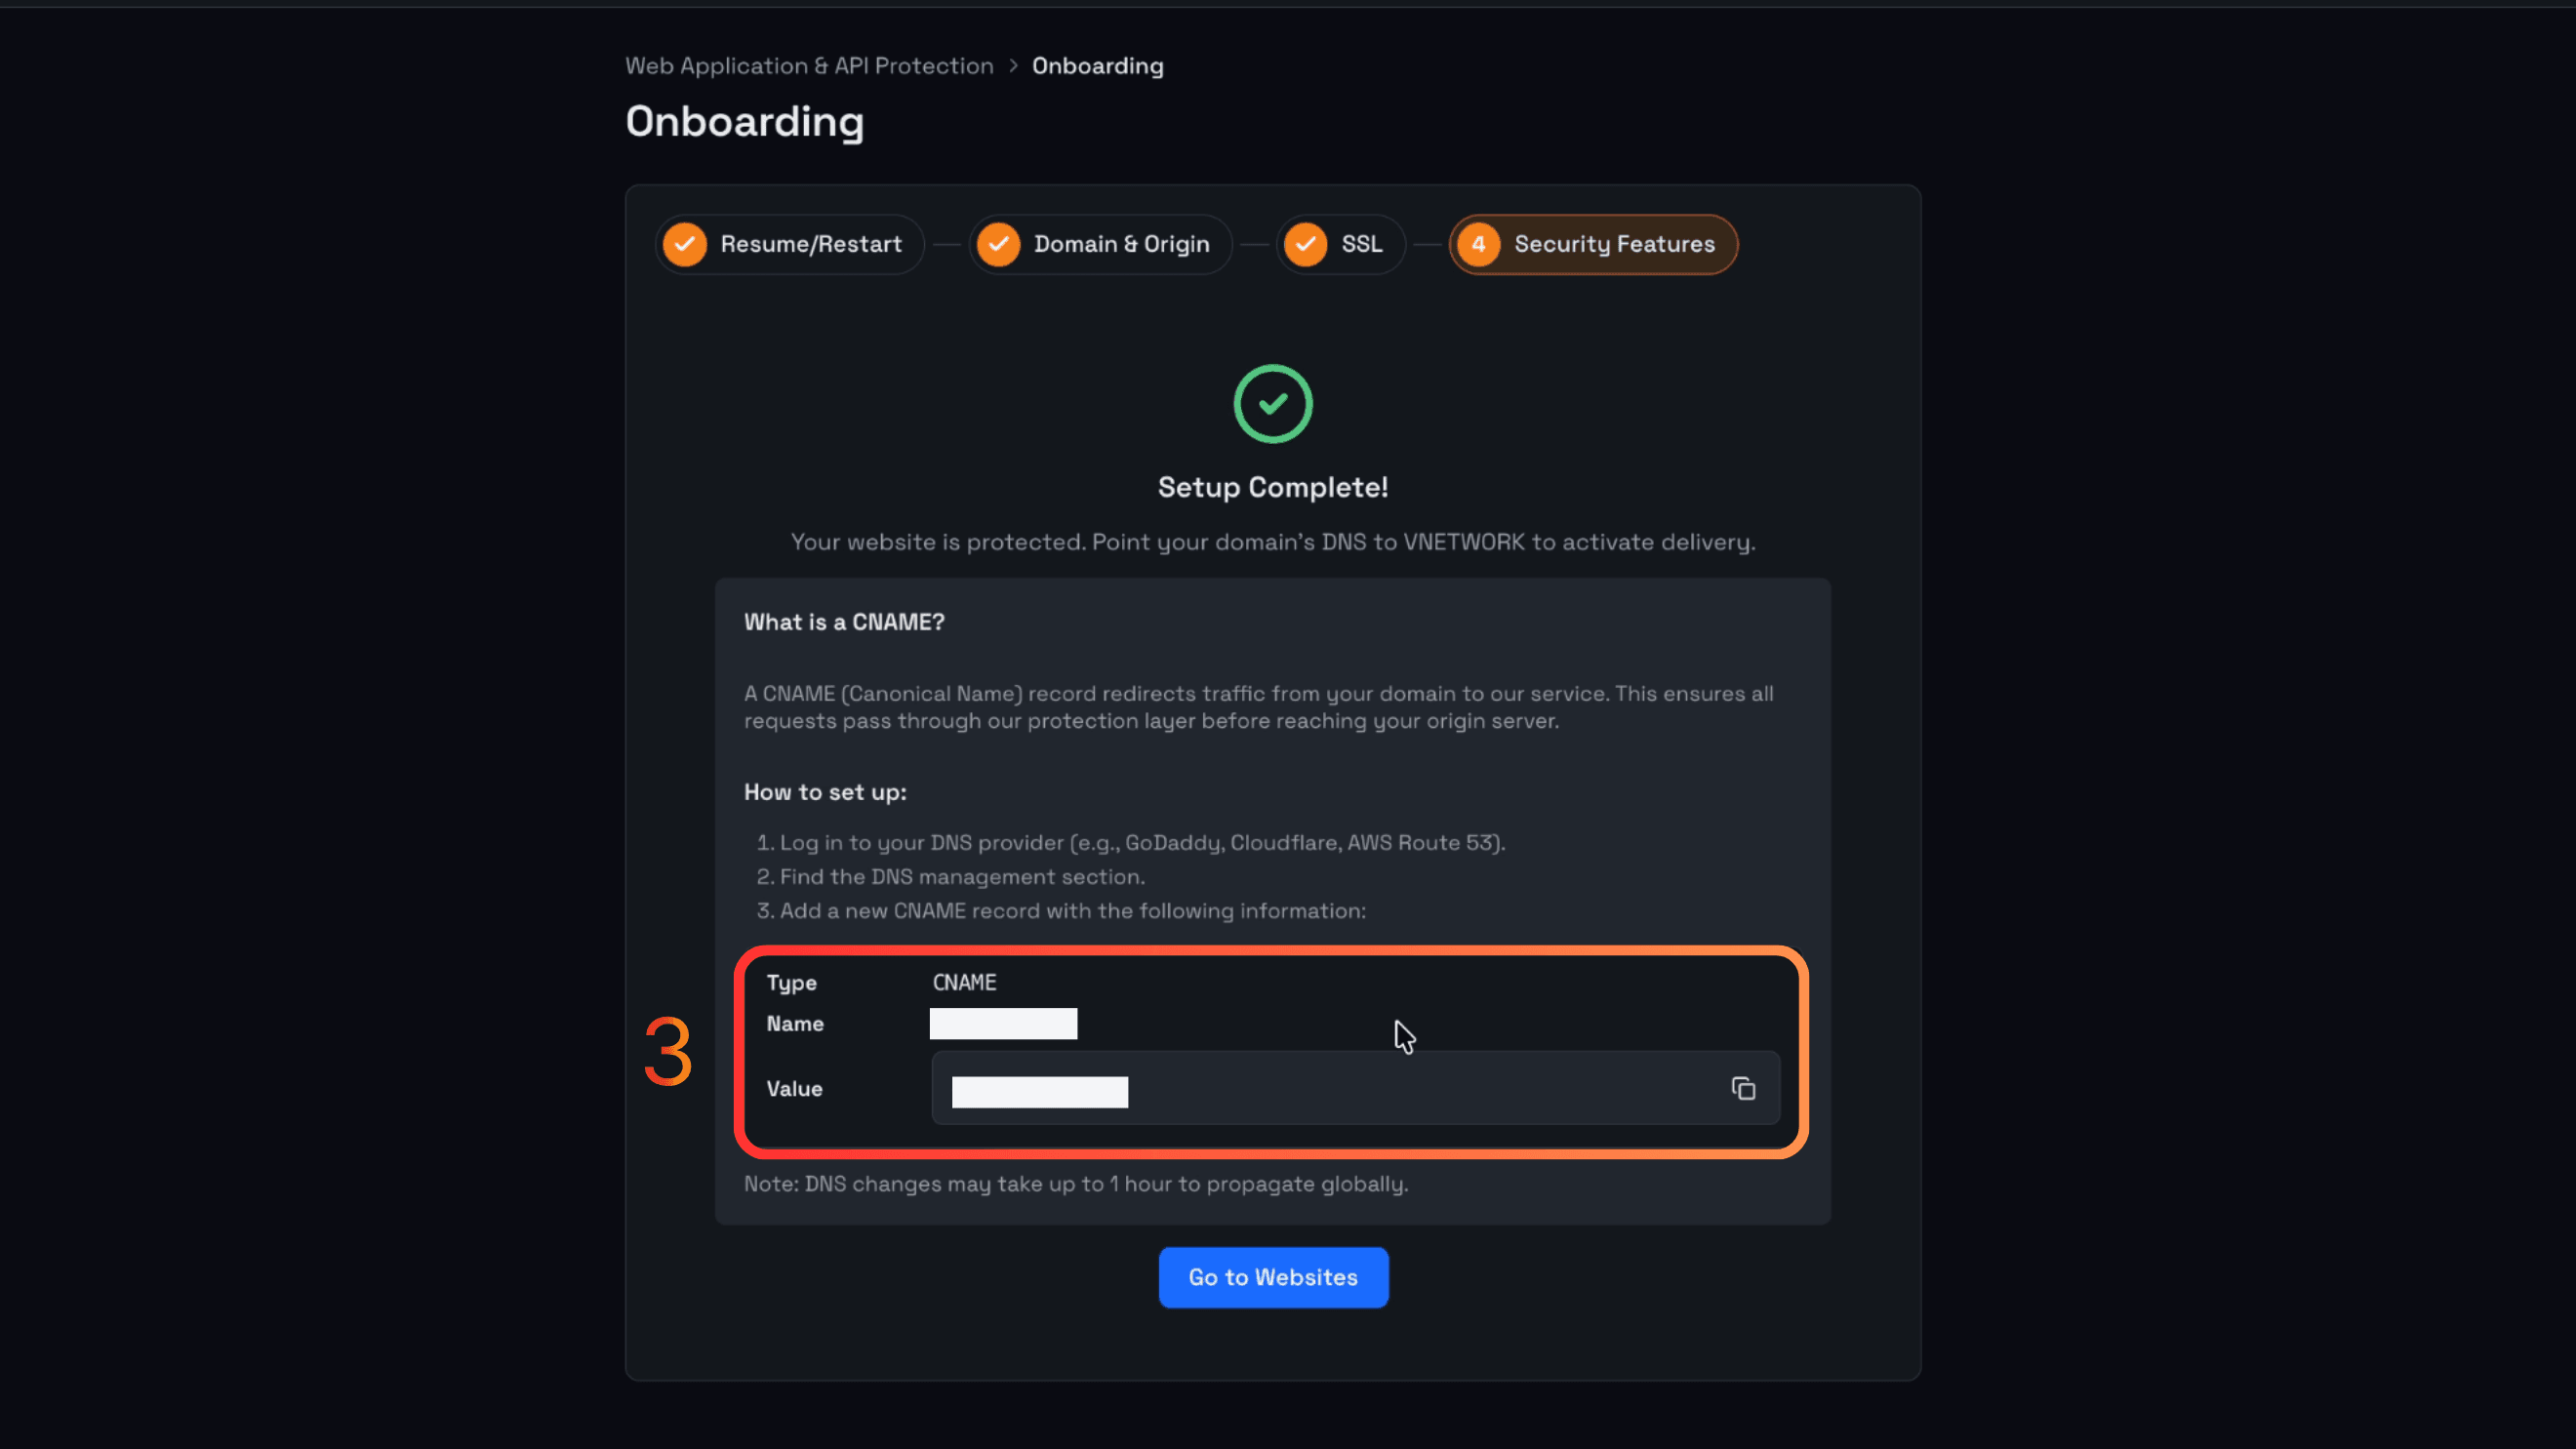
The system displays the Setup Complete screen along with a CNAME record containing two values, Name and Value. The customer goes to the DNS system currently managing the domain (GoDaddy, Cloudflare, AWS Route 53, etc.), adds a new record with Type: CNAME, then enters the Name and Value exactly as provided by the system.
DNS changes can take up to one hour to propagate globally. Once DNS takes effect, all traffic will be routed through the WAAP protection layer. After configuration is complete, click Go to Websites to review the website you just onboarded.
4. If the customer already has SSL
Step 1: Declare Domain and Origin
Enter Website Domain, the public address that users will access (for example, example.com), without http:// or https://.
Enter Origin Server, choose the http:// or https:// scheme from the dropdown depending on the customer's actual configuration, then enter the IP address or domain of the origin server (IPv6 is not yet supported).
Note: The declared domain must not be the same as the CDN domain. Information entered at this step can be edited later in the Websites section if needed.
Step 2: Configure SSL
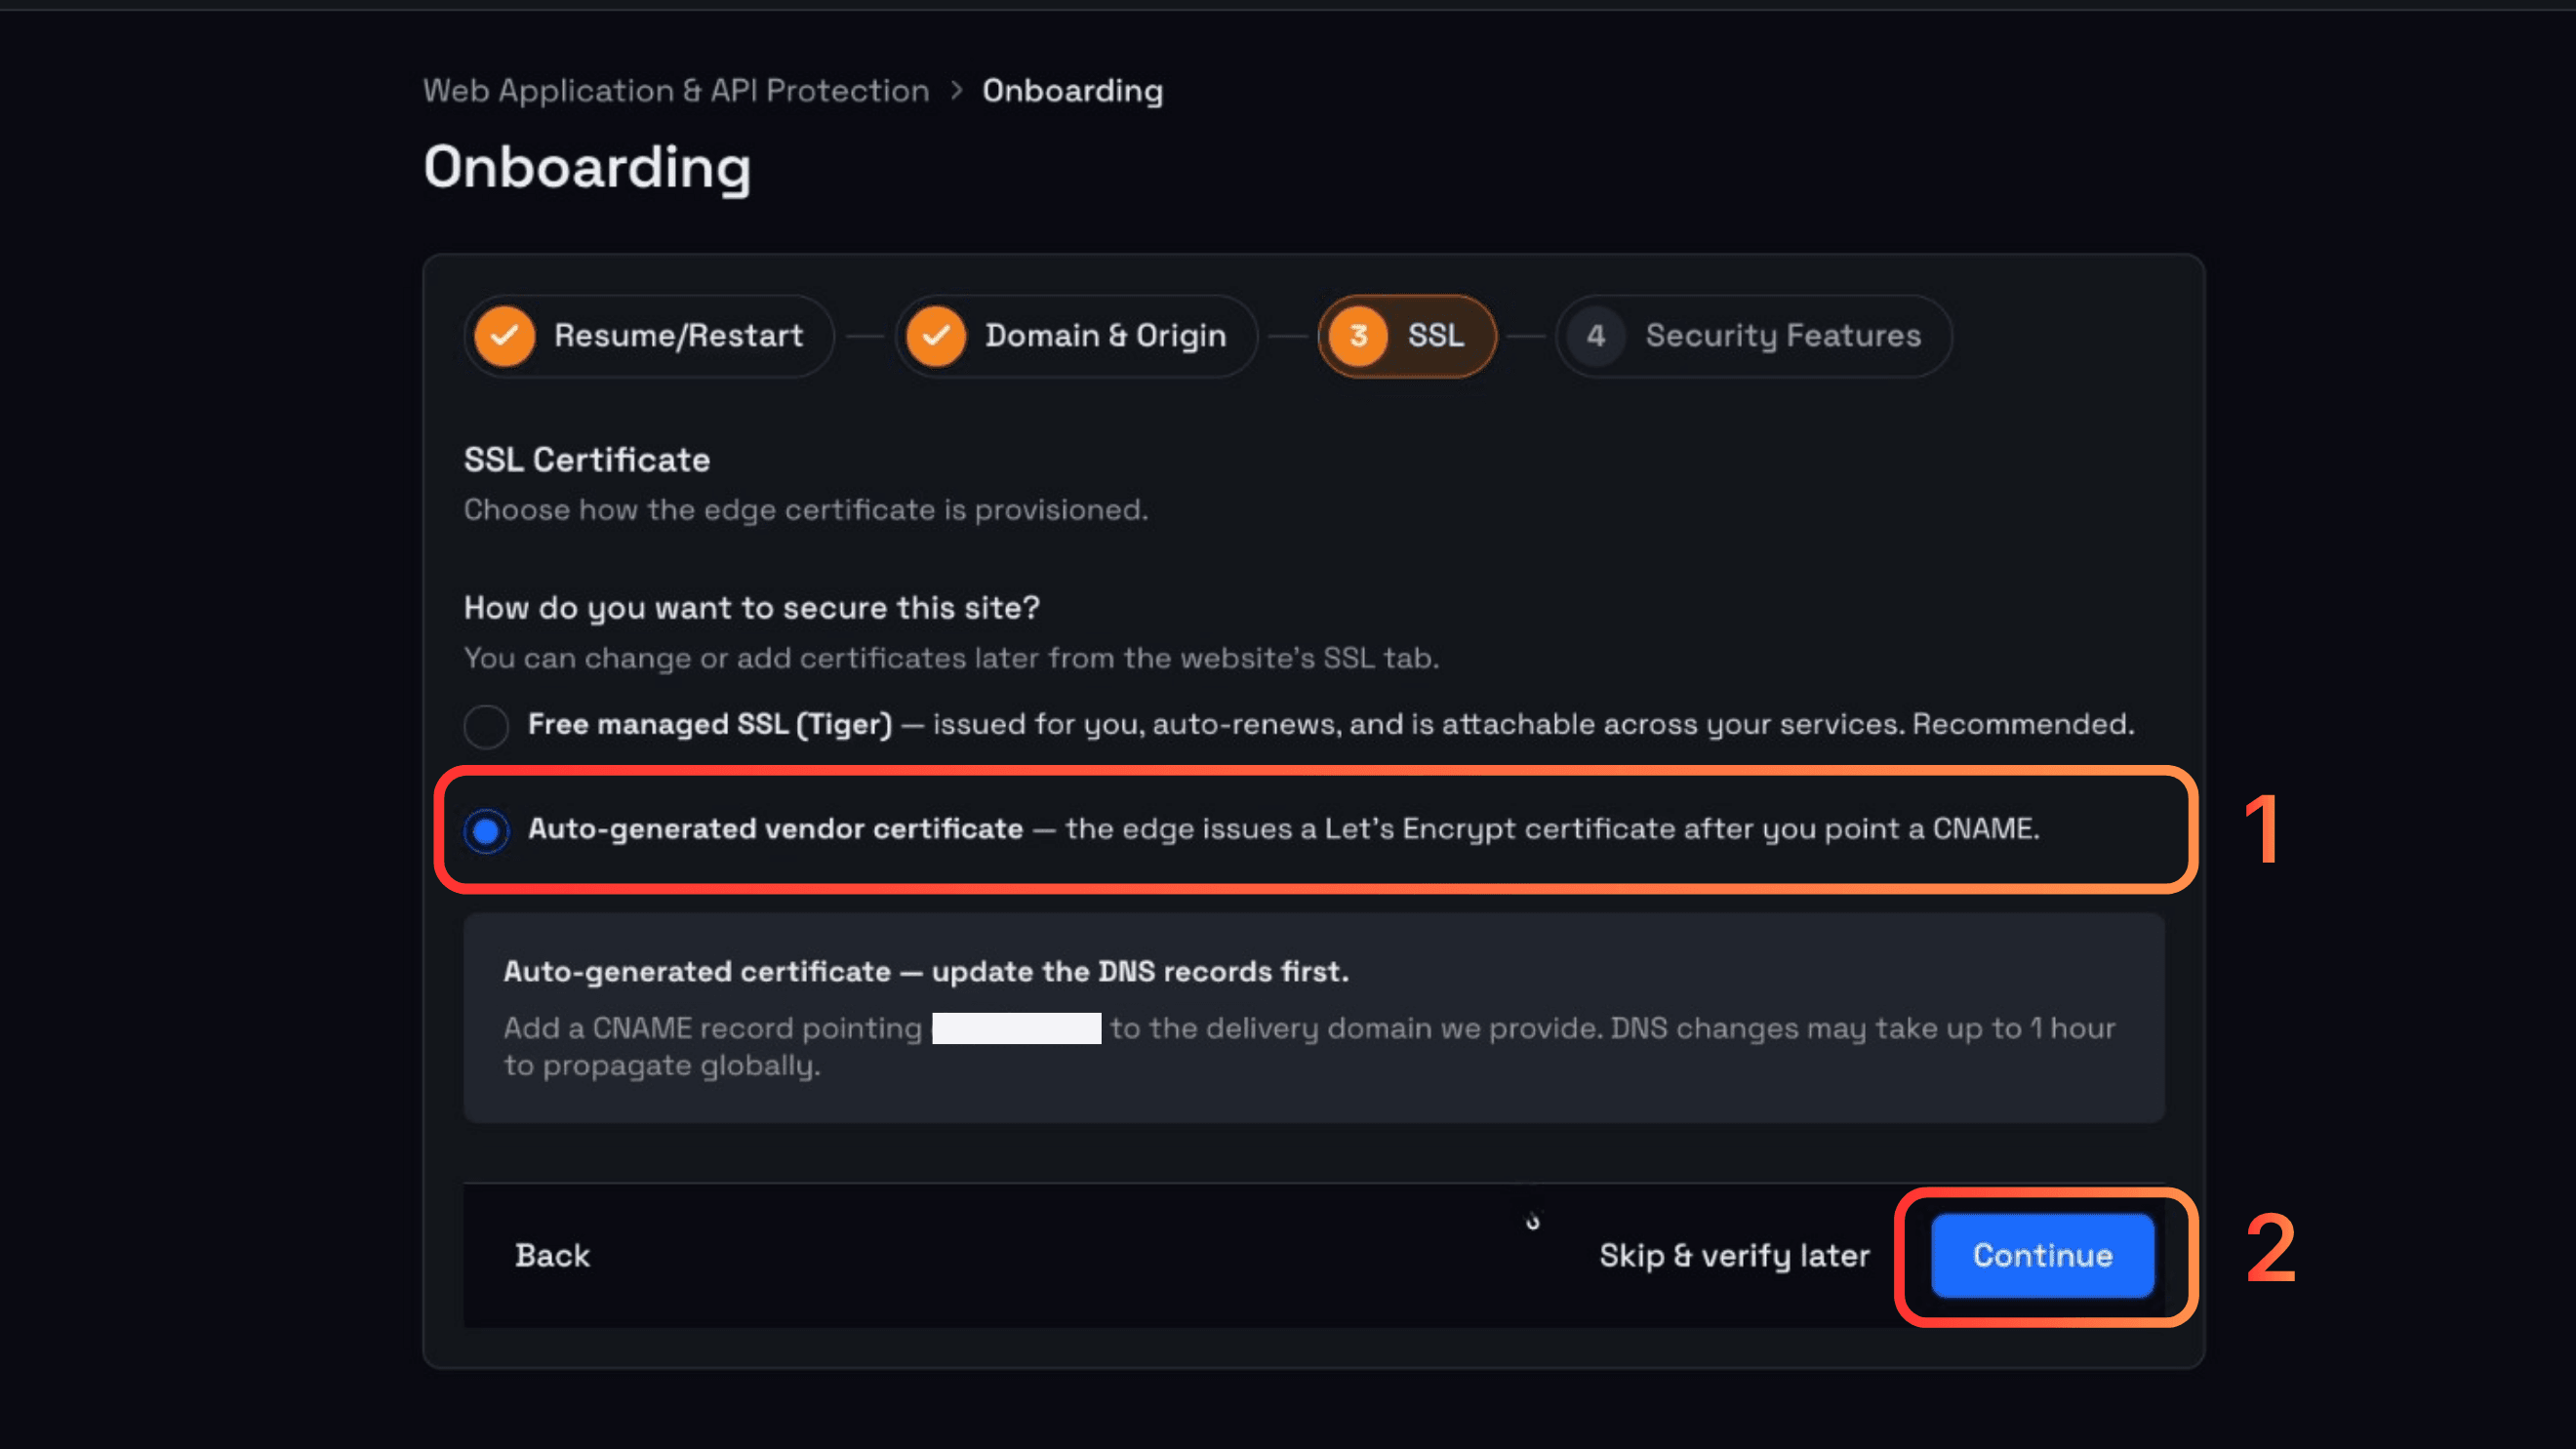
At the SSL Certificate step, select Auto-generated vendor certificate. With this option, the edge system will automatically issue a Let's Encrypt certificate once the customer points the CNAME to VNETWORK.
Click Continue to move to the next step. (If not ready yet, you can select Skip & verify later to configure it afterward.)
Step 3: Activate WAF
Select the AI WAF Basic protection level.
Once complete, the system provides a CNAME record with Name and Value. The customer goes to the DNS system currently managing the domain (GoDaddy, Cloudflare, AWS Route 53, etc.), creates a new record with Type: CNAME, then enters the exact Name and Value returned by the system.
Step 4: Upload the SSL certificate
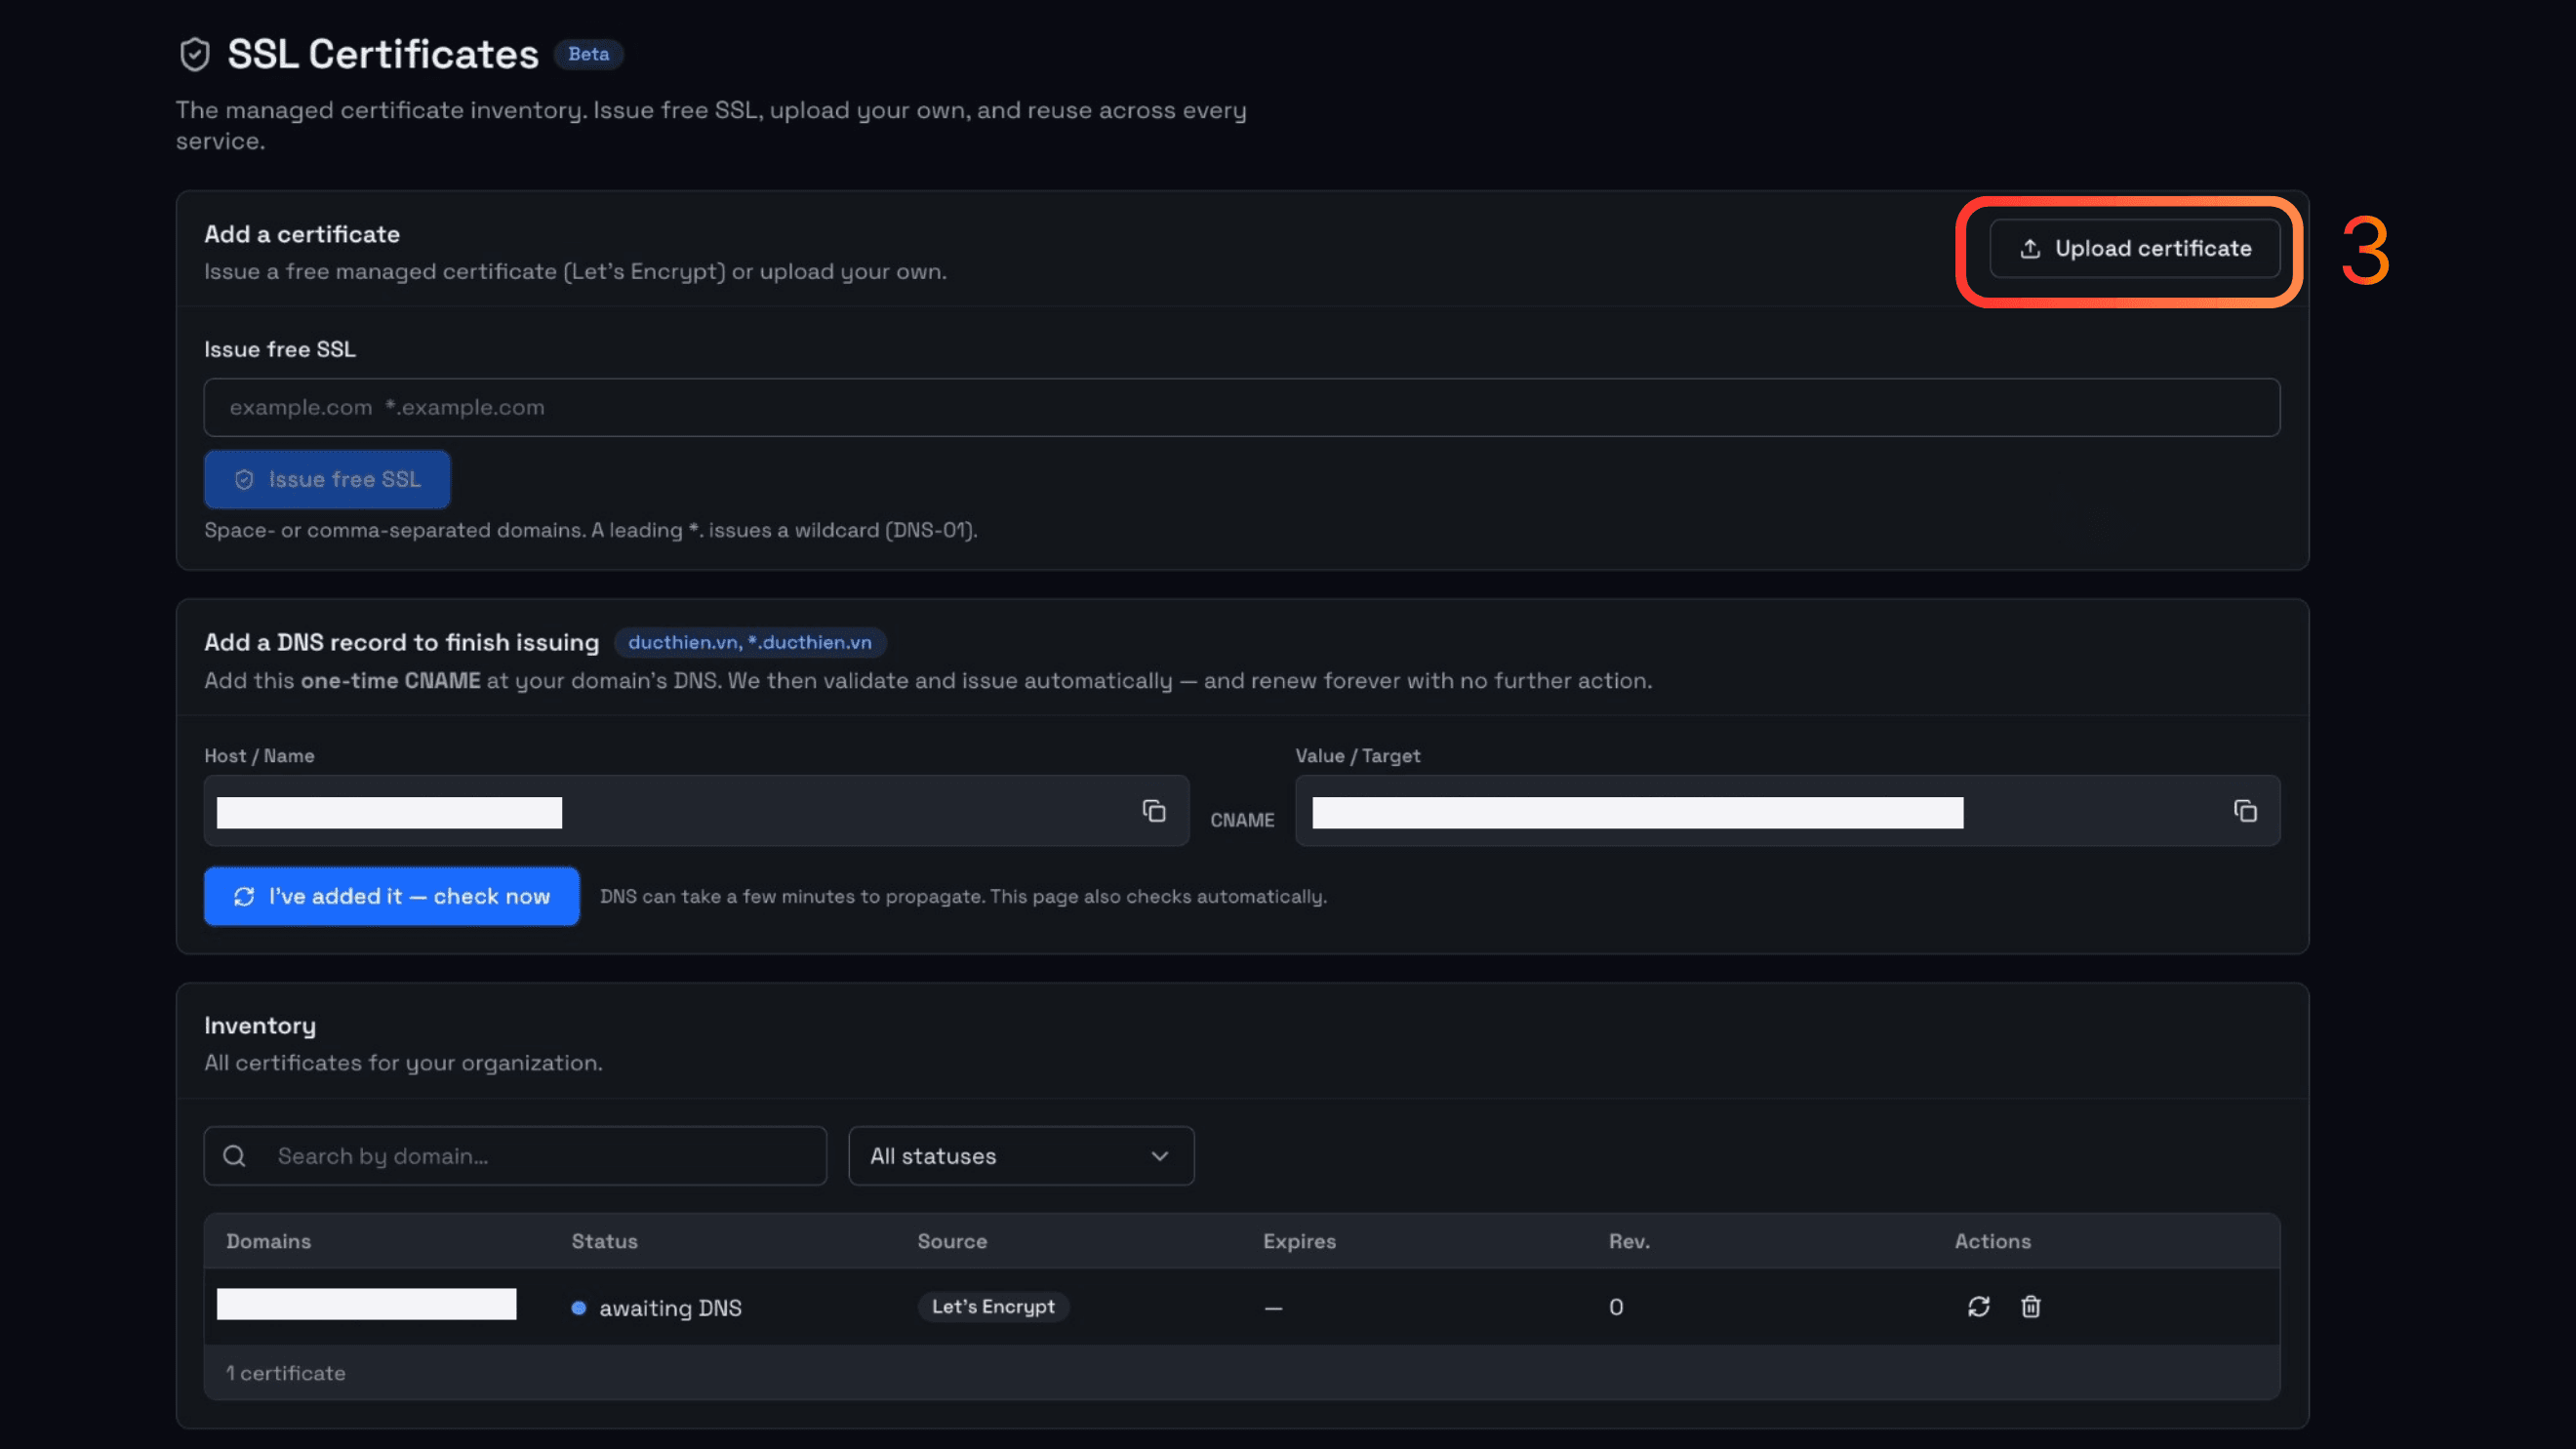
Go to Security → SSL Certificates, select Upload certificate, and upload the SSL certificate the customer already owns to finish.
5. Upgrading when the website needs deeper protection
WAF Free is suitable for new websites with moderate traffic. As needs grow, VNETWORK offers additional Standard, Pro, and Custom plans with higher domain limits, bandwidth, and request volume, while unlocking additional features such as Bot Management, API Protection, and Programmable Mitigation. Businesses can view details and switch plans directly in the Subscription plan section of the console, or contact the VNETWORK team for advice on a Custom plan suited to their system's scale.
6. Conclusion
Activating WAF Free takes only a few simple steps, with no need for a dedicated IT team or changes to the existing system architecture. Whether or not the website already has SSL, businesses can complete the onboarding process and bring the website under protection in just a few minutes, ready to upgrade to a higher plan when the system needs deeper protection.
Get your business's website protected today!
FAQ - Frequently asked questions about activating WAF Free
1. Does WAF Free limit the number of domains or traffic?
WAF Free is designed for the basic security needs of a single website, and the domain and traffic scope follows the subscribed plan. When needs exceed this scope, businesses can upgrade to the Standard, Pro, or Custom plans.
2. Can I upgrade from WAF Free to a higher plan?
Yes. Businesses can upgrade their plan directly in the console without reconfiguring from scratch, since all plans belong to the same Web Application & API Protection service.
3. Should I choose Free managed SSL or Auto-generated vendor certificate?
If the website does not have SSL yet, choose Free managed SSL since it is issued and managed directly by VNETWORK. If the website wants to keep its existing SSL certificate, choose Auto-generated vendor certificate at the SSL step, then upload the certificate separately in a later step.
4. After pointing the CNAME, how long until the website is protected?
DNS changes can take up to one hour to propagate globally. Once the CNAME record takes effect, traffic to the website will be routed through the WAAP protection layer.
5. Does activating WAF Free affect page load speed?
WAF Free runs on VNETWORK's edge network infrastructure and comes with built in Content Acceleration, so it does not slow down the website. In many cases it even helps improve page load speed.